

So you are thinking of creating a website and not sure where to go and how long it will take, I have a quick and easy solution for you with Bluehost, my hosting provider.
These days I think everyone is in the website hosting business and there are many providers you can choose from, but I know Bluehost can can get your website up and online in no time.
Wither you are a techie and like to do everything yourself or someone who just wants to get online and not worry about the details, Bluehost has solutions for you.
So how do you get started…
Before you even go to Bluehost, I would recommend that you do a little pre planning.
Things to think about:
- Your domain name. Come up with a list of domain names that you might want to use. I would come up with at least 3 and order them in preferred order. There is always a chance that the name you want is already taken so you want to have your 2nd and 3rd choices ready to go.
- Think about the type of site you want to have. This is anything from a blog to a just a e-commerce store. Bluehost has options for any type of site that you want and I believe WordPress can accommodate most types, but if you need a specialized type of site, they have various options for those as well.
- Know you budget. Like every hosting site there are a ton of options from the low-end shared hosting to dedicated servers just for you site. You can always start at the shared hosting option and move up the options list to the dedicated server as needed. Also, you can get more for your money using the introductory pricing if you get multiple years of service up front. This is what I did and it has saved me a lot over my initial sign-up period
- Think about your content. This mainly comes in for the Basic and Plus shared hosting options as there is a limit on server space. If you site is going to be heavy on images or videos that are stored on your site you may have to go with the Pro shared site option to start as it has unmetered storage space
Knowing these things will help you deciding which of the multitude of services that Bluehost can offer that you will need to start with.
Now that you have done your pre-planned. Lets go through the steps of getting you online and up in running.
Step 1. Go to Bluehost. Click Here to go to the page shown below. This is my affiliate link and gets you the best sign-up deal they offer. They only offer these deals to affiliates, which is why I signed up with them so I could get you the best deal possible. It will open in a new tab so you can still follow along on this page through the different steps
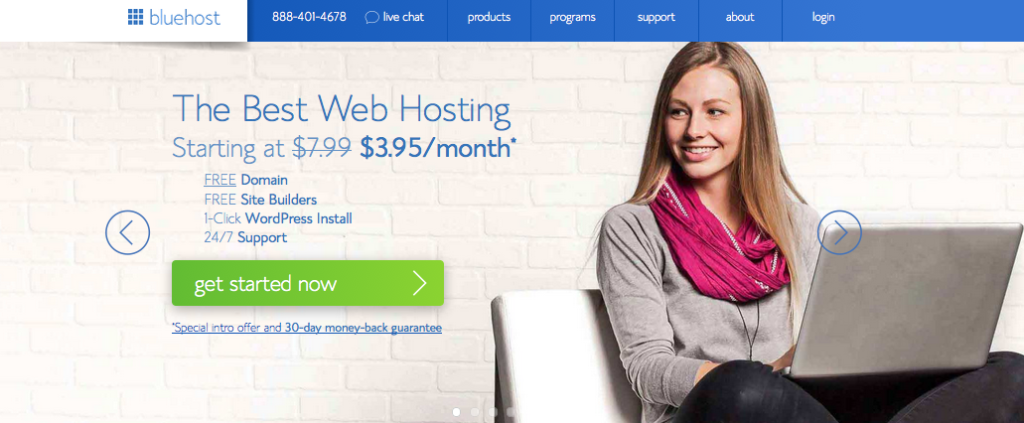
Click the “get started now” button.
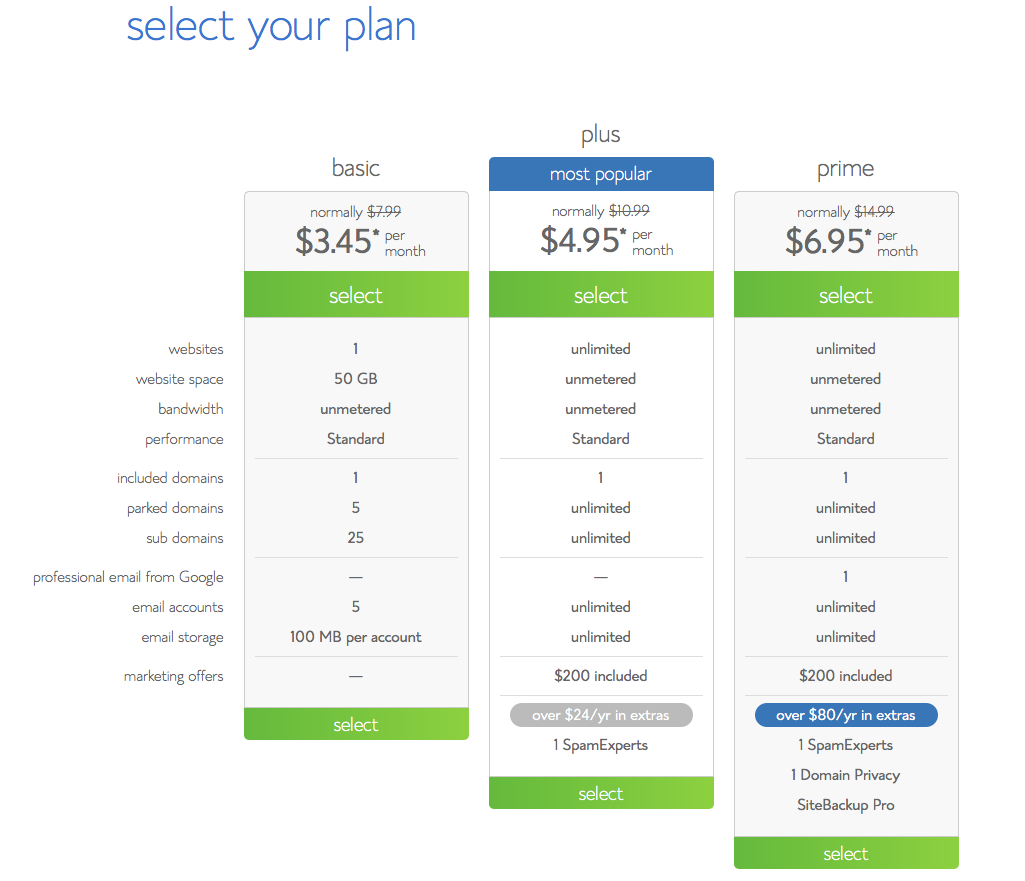
Now it is time to choose your plan. These are the shared hosting plan options and where most folks will start. If you already know that you need another type of plan that Bluehost offers such as the dedicated hosting option, go up to the menu bar, select hosting, and choose the plan that you need.
This is where the knowing your budget in advance comes in handy. The pricing usually shown on this page is the per month pricing if you go with the 3 year plan. I would highly recommend going with the 3 year plan if you can afford it now as it can save you a fair amount of money over the regular pricing. For example, if you go with the Plus plan above for the 36 months, you will save $145 over that time period. You will only get these deep discounts on initial sign-up.
Make your decision and select your plan.
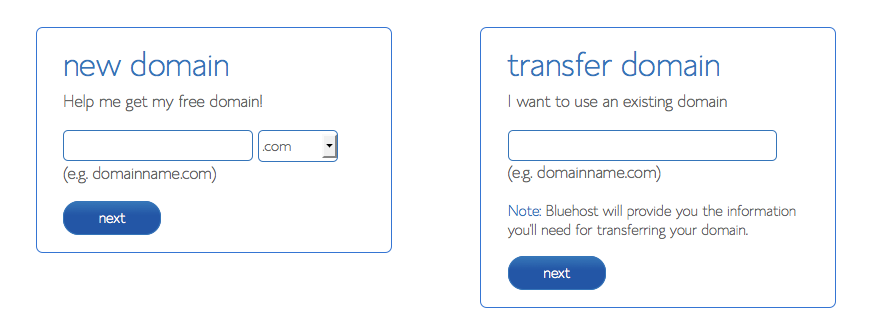
Now on to the domain part of the sign-up. Again, this is where having the 3 domain names in advance will speed things up. For those who are getting a domain name for the first time, you would enter in your first choice on the left under New Domain and click Next.
You do have the option to choose from other domains other than .com but I would at least get the .com version of your domain to start with. You can decided at a later date wither or not you want the other domain versions.
If your first choice of domain name is already taken, type in your 2nd choice and try again.
If you already have your domain name registered elsewhere and are going to use that domain name for your Bluehost website, enter that full domain name on the transfer domain box on the right. Later on you will either transfer the domain registration to Bluehost or get the instructions on how to point the domain from your current domain registrar to the Bluehost name servers.
It is totally up to you wither or not to have your Domain Name registered by or with Bluehost. For those who are setting up a new site for the first time, I would recommend registering it with Bluehost. That way all your website registration and hosting information is with the one provider. In my case, I use another service for my domain registration as I had already registered my domains before becoming a bluehost customer. I may move them over to Bluehost at a future expiration date as Bluehosts’ domain registration pricing is very competitive with the other more known registration services.
If you are getting a new domain name via Bluehost, you will get the first year of registration free as part of the plan.
So you have picked your domain or entered your existing domain. You are now on to customer account information page.
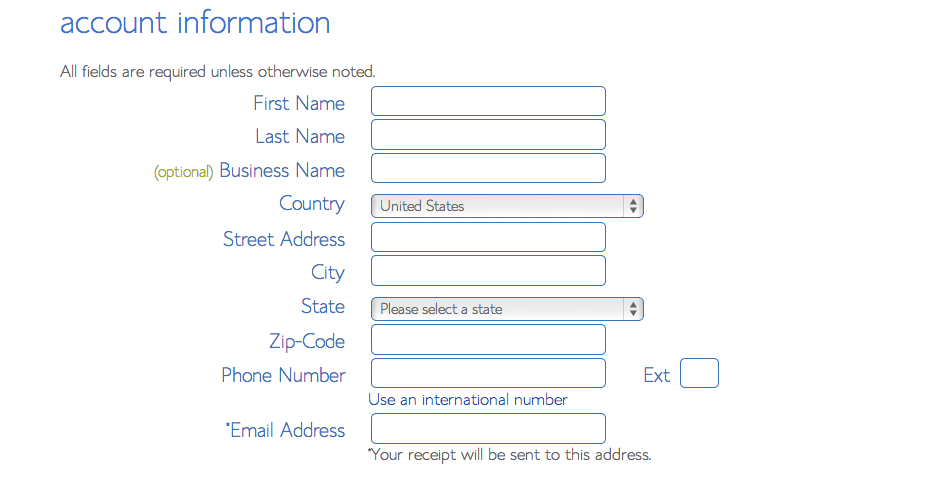
Enter your information as required.
The bottom part of the page shows the various options you can choose with the hosting option you previously selected. As with all hosting services there are always options…
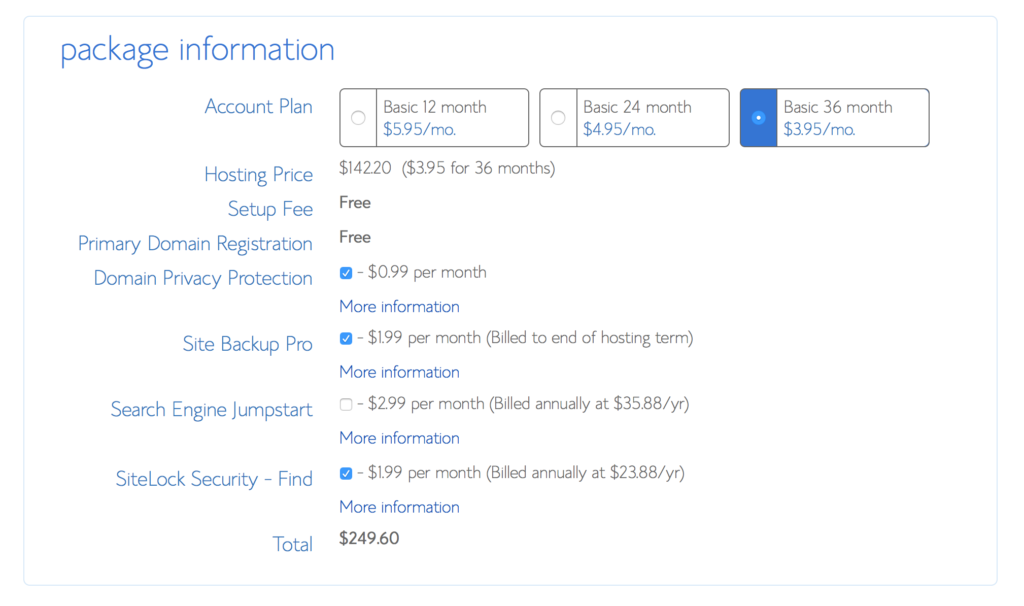
Confirm the Account plan you selected on the previous page is still selected. If you changed your mind, you can change it here and it will show you what the new price will be. You can also change it just for comparison to see what the total is and what the savings would be at each term period. If you are transferring a domain, you will not get the Free domain registration or Domain privacy options as shown above.
As for what options to choose, this is going to be up to you.
I do my own backups, but if you are not familiar with doing your own backups then I would recommend getting this service. You ALWAYS want a backup of your site. I’ve already learned this when I added something to my site and it brought it down. I had to use my backup to get things back up and running. Think of it as insurance, you hope you never have to use it, but when you do, you are glad it is there.
For my particular situation I had transferred my domain so I didn’t need to register my domain or choose the Domain Privacy Protection. If this is a new domain, I would recommend getting the domain privacy option especially if it is an individual that is registering the domain name. Click the More information link to see details on what that service provides. I do use that service on my domain names.
I’m already familiar with web hosting so I didn’t need the Jumpstart option, but again, click the more information to see if this service is something your would like to use.
The SiteLock Security is something new since I signed up so I do not have an opinion on that at the moment, but again, click the more information to see if this service is something your would like to use. But from what I”m reading in the description, if you plan on having a store as your site or part of your site I would consider this service.
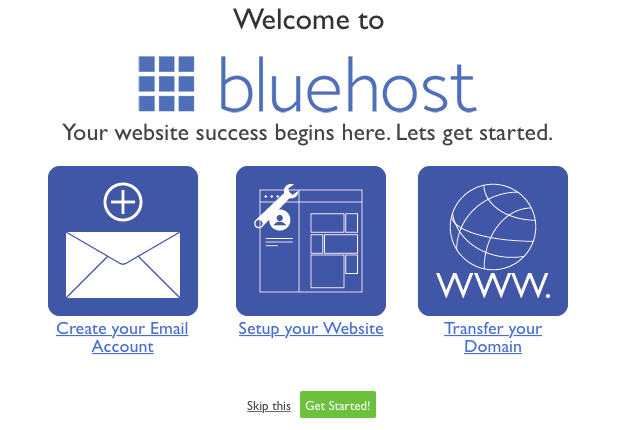
Once you have completed the above sections, entered your payment information, and submitted the form, you will get logged into your new account on Bluehost and be shown the page below.
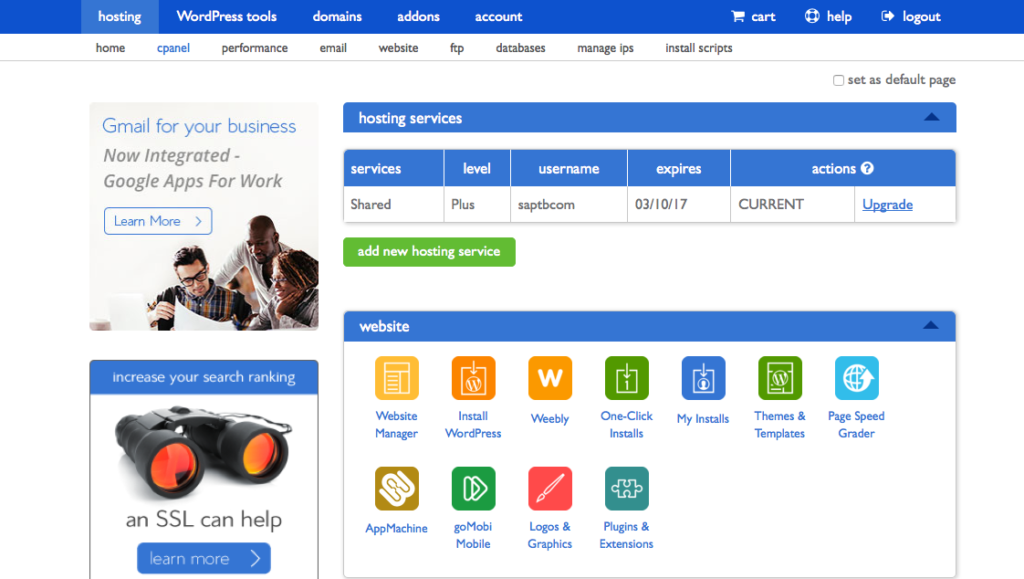
This is the magic behind the scenes page for your Bluehost service.
You may also see the following pop-up window.
You have option to click on each step to set your Bluehost services. If you do, start at the left and go right.
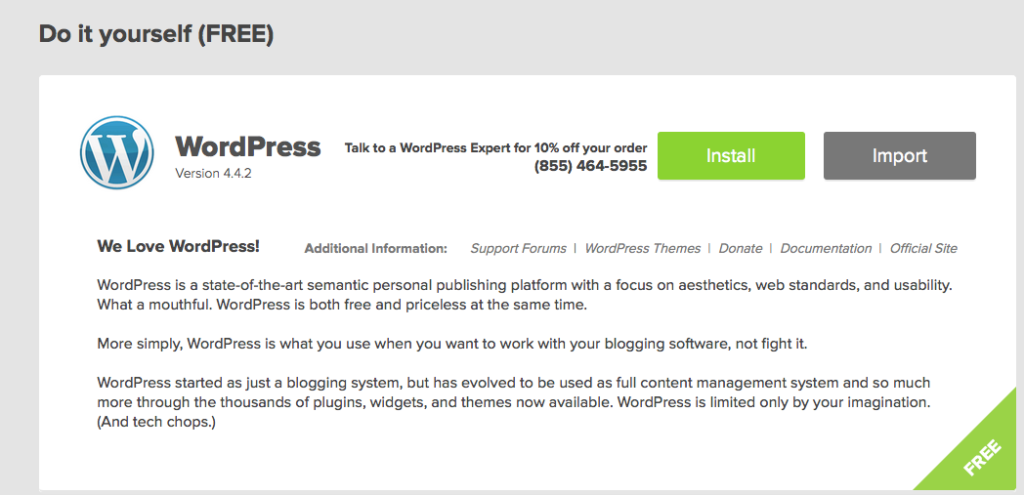
Installing WordPress.
Bluehost has an easy to use “Do it yourself” scripts for installing WordPress as the software your new website will run on. This is the software that my site runs on and the one I recommend.
You can install a new wordpress instance or if you have a wordpress site elsewhere that you are moving to Bluehost you can choose the import option. As always, you do have the option to have a Bluehost WordPress Expert help you with either installing a new site or migrating and existing site to your Bluehost service. If it is a new site, I don’t think you will need to use their service as the steps are straight forward and easy to follow. For importing, you may wish to use their service to make sure everything is set up correctly.
Installing WordPress via the WordPress Tools menu.
My preferred method to install
Step by Step instructions for the WordPress install via the MojoMarket Place
The following prompts are from the Mojo Market Place install options which you can get to either by clicking the “One Click Installs” button or the “Install WordPress” button in the Website section of your Cpanel.
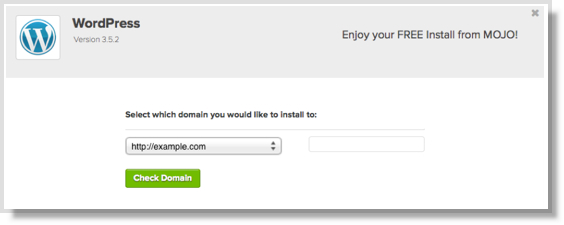
You have clicked “Install” on the Do it Yourself page above, so now what. Well you have to choose the domain that you want associated with this new WordPress install. You will get the below dialog box with a pull-down menu of all the domain names that Bluehost has for your account. Select the one you created when you create the account.
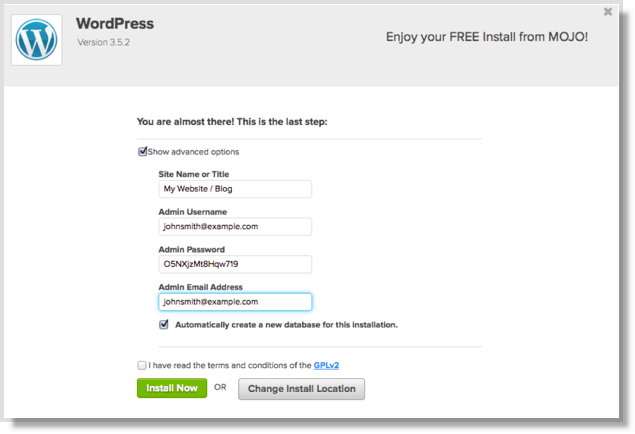
Next complete the Site name and Admin account information and give your site a name as shown in the below example.
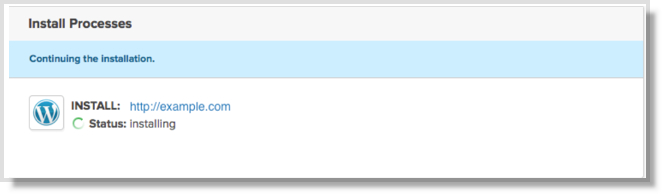
Once you click “Install” you will get the below progress bar showing you the status of the install. It is very quick and will return to the WordPress tools page when completed.
When the install is complete you will now login to your new website and start configuring the many options you have in WordPress. If you have not watch my video it does show the WordPress admin screens to you can get and idea of what they look like.
Now you are on to adding content and customizing your site. But that will be for another post sometime. Only thing I will say for now is. Don’t get bogged down in choosing a template, it is very easy to get stuck in the mode of viewing and trying different templates. Just start with a simple one and get your content into WordPress. You can easily change the template later to give your site a whole new look, but you need to content there.
#bluehost #webhosting #discountedwebhosting #wordpress #domain #online
