Had a great Solar Eclipse Day

It was a long hot day but well worth the 12.5 hour drive in traffic on Sunday

I’ve only ever seen partial eclipses before and being in totally was an spiritual experience that I definitely plan on doing again in 7 years

Not everything went as planned as far as taking pictures but I did get some interesting shots and will be posting over the next week or so as I process them.

Had a panic moment as one set of memory card got full just before the totality but luckily I had my other cards on hand

I hope everyone had a great viewing experience wherever you were

Aurora HDR 2018 for Mac and PC

Aurora HDR 2018 for Mac and NOW Windows

That’s right folks,

Aurora HDR 2018 is now available for Mac and Windows.


So what is Aurora HDR for those who do not already know….

Aurora HDR is not just a tool for merging bracketed images, it also provides numerous tools and countless options to create perfect HDR photos for every taste – from one-click presets and advanced tone-mapping, to layers, noise reduction, and powerful luminosity masking controls.

Sign up to be notified when you can Pre-Order Aurora HDR 2018 for Mac or Windows today


Here are some of Aurora HDR’s Key Features that currently exist:

  • Total HDR editing experience with a complete set of tools available.
  • Fast, powerful RAW processing engine.
  • Tone-mapping algorithm to achieve both realistic and dramatic HDR images.
  • Over 70 presets that give photos an amazing HDR look in just one click.
  • Luminosity masking that automatically makes advanced selections within HDR images based on the Zone System.
  • Unique layer system that supports blend modes, custom textures and using original exposures as source images.
  • Image Radiance, brushes, masks, lighting, vignettes and much more help users achieve their artistic vision
  • Highly versatile batch processing
  • Works as a standalone app, or a plug-in to Photoshop and Lightroom


And here is some of what’s new in Aurora HDR 2018:

  • Lens Correction Tool – The new Lens correction filter easily fixes all kinds of lens distortion, from barrel to pincushion, to chromatic aberration and vignetting.
  • New User Interface – Redesigned from scratch, the modern and responsive user interface brings a powerful, yet joyful experience to HDR photo editing. (See sameple images below of the new interface)
  • Cross-platform versionAurora HDR 2018 will be available both for Mac and PC users. Files are interchangeable and mixed-computer households can share the same product key.
  • Speed Improvements – Up to 4x improvement in RAW image processing, and up to 200% faster merging and masking performance means that Aurora HDR 2018 is dramatically faster than the last version.

And there will be more new features I’m sure.


You will be able to pre-order Aurora HDR 2018 on September 12.

The software will be released for download on September 28.


The All important, So How Much is It?

Pre-order pricing

  • Current users of Aurora HDR may upgrade at a special pre-order price of $49
  • New users can purchase Aurora HDR 2018 at a special pre-order price of $89
  • A collection of bonuses will also be included with every purchase.
    • To Be Determined as to what the bonus items will be, but I will add them here as soon as they are announced.

After the Pre-Order Period ends, the regular retail pricing is

  • $59 for current Aurora HDR users
  • $99 for new users


Generous Licensing model:

For households that have both Mac and PC (Windows) computers, you can share the same product key for both Mac and Windows up to the maximum of 5 activated devices.

Or if you are just a Mac household, up to 5 Mac devices.

Or if you are an all PC (Windows) household, up to 5 PC (Windows) devices.

You get the idea. Mix and match as much as you want to up to the max of 5 total devices using the license.


Sign up to be notified when you can Pre-Order Aurora HDR 2018 for Mac or Windows today


Sample images of the new simplified user interface

Lens Correction


Filter UI


Aurora, AuroraHDR, AuroraforWindows, AuroraforPC, Aurora2018 AuroraHDR2018, affiliate, Mac, Windows


Something cool coming to Windows

Something cool is coming to Windows for the first time.


This particular app has only been available for Mac, but a full announcement and details will be available within a week.


I would love to give you the details now, but as an affiliate, I get early notification and can only tell you on the announcement release day.


All I can say is that is it something Windows users have been waiting for. So stay tuned.


Some hopefully helpful advice on the 2017 Solar Eclipse.

I’m planning on driving to a location for the total solar eclipse this year and thought I would post what sites I plan to use and those I found helpful to me in planning.

First, I’d say, if you are a procrastinator like me you will need to get your accommodations.   Depending upon the area you are going to, more than likely all the accommodations in the direct center path area are already full.  Look for areas that are on the outer edge of the total eclipse shadow zone. You might still be able to find something there, but expect to pay top dollar at this point.  That is the situation I’m in, but I still plan to drive about an hour to get to the center of the shadow of the total eclipse.


Recommended Websites

To find locations that are within the shadow of the total eclipse, the best site I’ve found so far is.

Interactive Map from the greatamericaneclipse.com

By using this map, not only can you find a location within the total eclipse shadow, but you can see the length of time the total eclipse will be visible for that area. If like me, my accommodations are on the outer edge, you can see where you would need to drive to get more time within the shadow. For my case, where I’m staying it would only be in the shadow for a little over a minute.  Where I plan to drive to it will be 2min 38sec.

This is what the interactive map looks like for the area I’m going to.

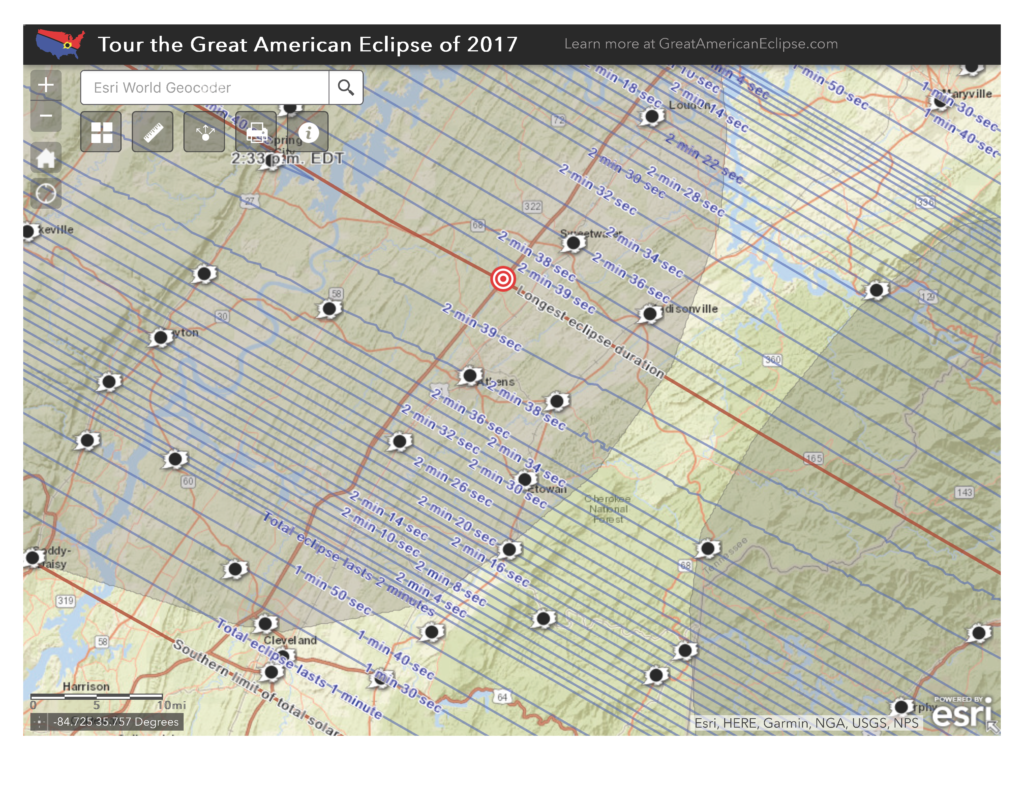
The biggest thing that I found helpful was the blue time lines. Due to terrain and partly due to the moon’s surface, the time lines to vary a little bit. Notice the 2min 38-second line gets a little squiggly as it goes over the mountains.


For an overview on the eclipse check out the NASA site at

eclipse2017.nasa.gov

Here you can get the all important Saftey tips, the Science behind the eclipse, and find out about some events planned. And more.


For the photographers out there, so far, the best site I’ve found for tips on how to photograph the eclipse is at

www.mreclipse.com

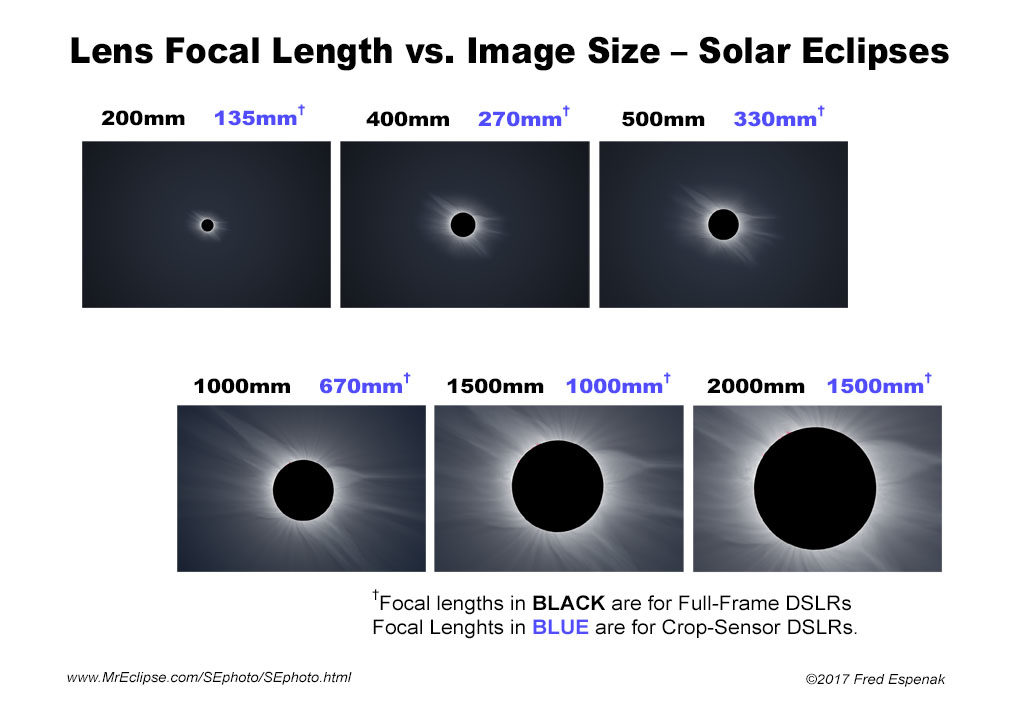
Two particular images I’ve found useful are

  1. The size guide showing what the sun would look like using a particular focal length lens shown here.https://www.mreclipse.com/SEphoto/image/SE-DSLR-Scale1pp.jpg
  2. The Exposure Guide:


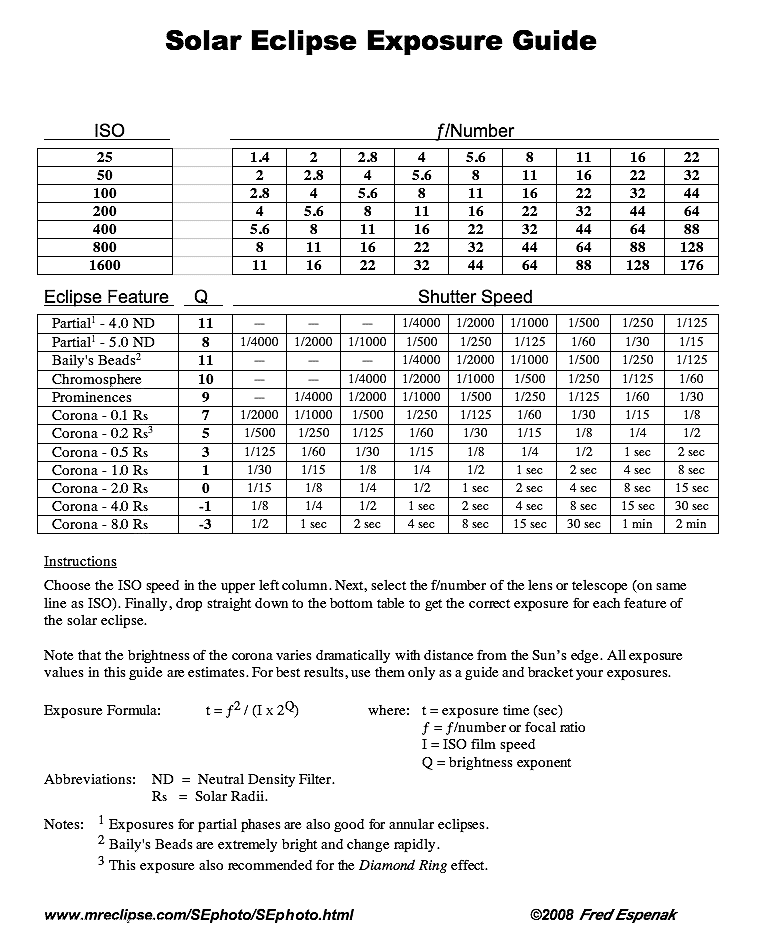
both of these images can be found in full artcile context at

www.mreclipse.com/SEphoto/SEphoto.html


The equipment:


No matter what camera you have, you MUST get a special SOLAR rated filter. Dark ND filters will NOT protect your camera. A lot of the solar filters are sold out, but it is still possible to get some at your favorite photography website like Adorama.com.

You will also need eye protection. Again, your favorite photography site like Adorama.com should have them. I happened to get my from another site and they are the paper version with the special Solar Rated shield.  You may look geeky, but you MUST protect your eyes. And I can’t stress enough, any other solution that does not meet the requirements of ISO 12312-2 for direct solar viewing should NOT be used.  There are many products out there and you need to verify that they meet this standard in order for you to look directly at the Sun during this eclipse.

Please verify this for yourself, but it seems if you are in the area of direct shadow from the full eclipse when the moon fully covers the sun, this is the short period of time that you can view the sun with the naked eye. You must wait a few seconds (say 15 to be safe) after the moon covers the sun to make sure you are in full darkness. And you must make note of how long the full eclipse will be for your location as you will need to put your eye protection back on before the sun peeks out the other side. (again maybe 15 secs before it is predicted to reappear to be safe)


What to do before the big day

Now that you have your location planned out, your Solar Filter and Eye protection, it is time to practice.

If you don’t want to start right out with practicing on the sun, practice taking pictures of the moon. Try out the various size lenses you have if you have that type of camera to get an idea of how big the sun will be in the image for that size lens.

After practicing on the moon, go ahead and practice on the sun with your filter attached and your eyewear on. Remember for the cameras with direct view finders such as DSLR’s, even with the filter on do not look through the viewfinder. The filter on your camera is designed to protect your camera and does not have the protection needed for your eyes.

Practice, practice, practice.

You want to get all the bugs worked out of your workflow or plan especially if you are going to change lenses during the event. You don’t want to get to the big day and miss the shot because you were fumbling with your camera during the short total eclipse period.

The one thing you can’t test for that I know of is the full eclipse. That is where the above exposure sheet will come in handy. But make sure to review, highlight, or do what ever you need to do to make note of what settings you will need during that time.

Not everyone is going to be in the total eclipse area, but a big majority of the United States will get to see at least a partial eclipse. This is the first total eclipse over the United States in some time so you don’t want to miss it.  You don’t have to stand out the entire time, but at least try to get out during the peak for your area.


Only slight plus on things is that if you totally mess up this time, take it as a learning experience for the next time a total solar eclipse comes to the United States in 2024.


And don’t forget while you’re taking pictures to stop and just take a moment and enjoy the experience. And have fun.


As soon as I get my own practice shots done, I’ll post them here so you may get an idea of what practice shots can look like.


Windows Public Beta of Luminar

Macphun is coming to PC with Luminar for Windows public beta

It has started, Macphun is coming to PC – Windows Platform with the release of the Luminar for Windows Public Beta

In its first foray into the Windows world, Macphun is releasing a public beta of Luminar for Windows today.

Sign up here today to receive your copy of the
Luminar for Windows Public Beta Today

During the beta period, Luminar for Windows is free to download and use

Key features of the Luminar for Windows public beta:

  • Adaptive user interface – Exactly matching the Mac version, the software adapts to the skill level and preferences of the photographer.
  • One-click presets – Over 50 pre-defined styles for every photography style.
  • Photo Editing Filters – Over 40 custom filters, each with built-in visual tips and a unique set of easy-to-use controls for correcting, enhancing and stylizing images.
  • RAW file conversion – Support for the latest RAW file libraries
  • Non-destructive workflow – Edit without fear.
  • Recommended System Requirements – Windows 10, Core i5 2.2 or better, 8GB RAM,1GB GPU RAM, SSD with 20+GB free space.

As with any beta

  • Beta version is not the final version and features are subject to change
  • Current beta version does not include all of the features/tools that the final release version will
  • Final version will be released late 2017

Now Windows Users can create stunning images like these with the ease of Luminar for Windows.

Before

After

A quick look at the Windows User Interface.

If you have already seen the Mac Version interface you will notice the layout the same.

#luminar #Windows #beta #affiliate


Free trials on some great photo editors


I”m calling July Free Trial month as you can get free trials on some great photo editors.


You know you are going to be taking photos during the summer. Maybe of your friends and family or from your great summer vacation.


So why not try out some of the best photo editors to see which will bring out the best in your photos.


Products from On1 that are for Mac and Windows computers.


You can use these as plugins to Lightroom and Photoshop or as standalone applications depending upon the app.

On1 Effects 10On1 Photo Free Trial

On1 Lightroom Presets Free Trial


For those who have Mac OS computers here are two great editors you can download and try for free.


#freetrial #photoeditor #affiliate


Photolemur now supports Windows 8

Photolemur now supports Windows 8 with

update 2 to Photolemur 2.0


You have been asking for it so Photolemur has added support to Windows 8. So with that it now supports Windows 8, Windows 10, and Mac OS X


If you own Photolemur, you can get the download within the application. It will notify you of a new update available and let you being the download to install after lauching.


If you do not yet have Photolemur you can get a free trial of the application.


Start your trial or purchase your subscription today at the Photolemur Website


#photolemur #affiliate #automatic #photoenhancer


Art Show Booth

Upcoming Art Shows

I’ve added some additional art shows to the list, so here are my upcoming local events.


July 1st – Celebrate America– Festival of the Arts (Hanover, Md)

10:00 am – 4:00 pm

WACA Center for the Arts
1788 Dorsey Road, Hanover, MD 21076


July 8th – Common Ground on the Hill

10:00 am – 9:00 pm

Carroll County Farm Museum
500 S Center Street, Westminster, MD  21157

Visit www.commongroundonthehill.org/festival-gen.html for more details on the event.


2nd Saturdays of the Month from August to October at the Westminster Farmers Market.

8:00 am – 12:00 PM

Conway Parking Lot
27 Railroad Ave, Westminster, MD 21157


More event dates will be added as possible, so check back here or follow me on Facebook for the Art Shows at American Kiwi Photo


When at the Art Shows, look for the Banner that Says

American Kiwi Photo


#artshows #americankiwiphoto #local


Upcoming Art Shows and A Thank you

Upcoming Art Shows


Art Show season has begun and I’m venturing out into the wide world of Local Art and Festival shows.


Just came back from my first show of the season that was a bit of a wash out due to rain, but I wanted to thank all that did come out and stop by my booth at the Hampstead Day Event in Arcadia, Md.

I never take anything for granted, so it was much appreciated for those who did make it and for those who purchased my work.


If you missed me today, you can catch me at my next show.


Art in the Park

Saturday, June 3rd from 10am-4pm

121 Longwell Ave, Westminster, MD 21157-2101, United States

Booth #82/83


Hope to see you there.


I’m working on other events, so be sure to check here or my facebook page(s) of AmericanKiwiPhoto and/or MarkDoddPhotography

#artshow #artinthepark #westminster


Free Luminar Presets

Macphun has released free Luminar presets and a free texture pack that is available to download.

So you have Luminar or are considering getting it, but you are not sure about what settings will bring out the best in your photography. Well, Macphun is here to help.

To help get you started with making fantastic photos, Macphun has worked with various photographers to create a great set of presets and textures that you can use to enhance your photos with just one click. You can either just use the preset as is, or you can use it as a starting point for your own adjustments. Best of all, they are free to download and use.

Once you have tried out the free set, consider a premium preset or the premium texture to get added instant effects for your photography.

The free presets include

  • Seascape Presets by Ellen Anon
  • Winter Hues by Discovery Photo Tours
  • Studio Portraits by Tony Corbell
  • Magic Hour by Jim Nix
  • Variations of Monochrome by Dan Hughes
  • The Box by Scott Wyden Kivowitz
  • Autin Drama by Jim Nix
  • View from Brooklyn by Hector Martinez.

And you can get the free Desert Dreams Texture Pack as well.

Once you have tried out the free presets you can purchase additional Premium presets like

  • Noble Monochromatic Preset Pack
  • Insta Inspiration pack by Jason Odell
  • Photo Essentials Pack

And the Premium Asphalt & Leaf Texture Pack.

New with Luminar 2018 a Free Luts Pack and Free Winter Presets Pack

 Get Free Luminar 2018 Presets and LUTs

A set of Presets and LUTs just for Luminar 2018

Download free Presets and Texture Packs for Luminar 2017 & 2018

Presets and Textures that can be used in both Luminar 2017 and 2018

If you do not have Luminar you can Download your Free Trial of Luminar and give these free presets and the texture pack a try.

Demo Video of installing and using the Presets and Texture

Check out

Free Cinematic Color Looks for additional Free Lumiar Presets (now called looks)

#Free #Presets #luminar #Textures #affiliate #freetrial