Some starting with Mylio Tips

Disclaimer: I may affiliate with a product mentioned on this page. As a result, I may receive some compensation from the vendor. This affiliation does not influence any of my commentary on any product that I may write about, nor does clicking on the affiliate links cost you anything, in fact, you may save some money.

Now that I’ve had Mylio for a week and have worked on importing my images into Mylio I thought I would give some tips based on my experiences. But as always, refer to the Mylio Manual or contact their tech support (Which has been great by the way) if you have any issues.
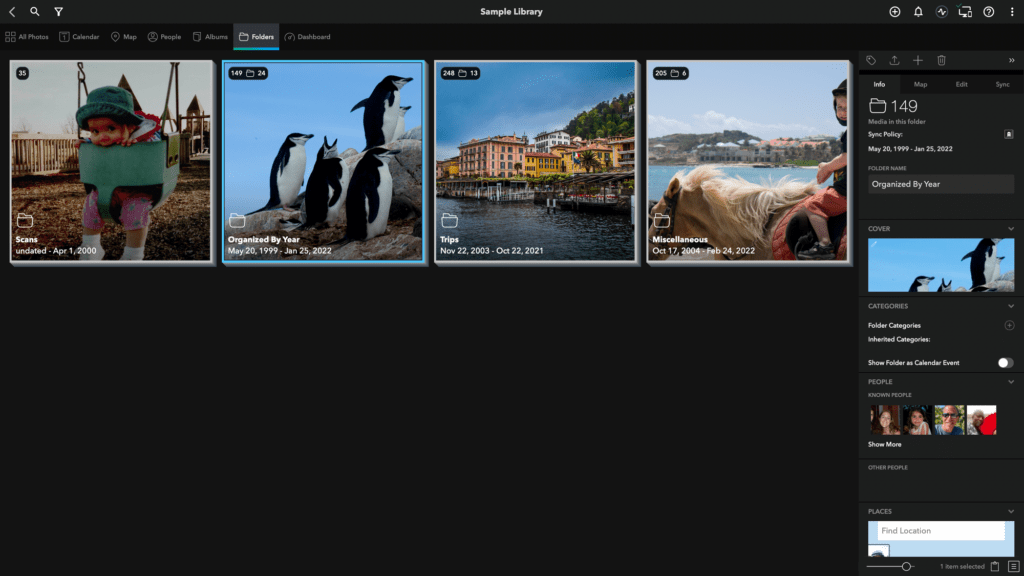
Importing

If you created a new folder for your Mylio Library

This is not my case so what I say here is just from my trial and error when I was testing it out.

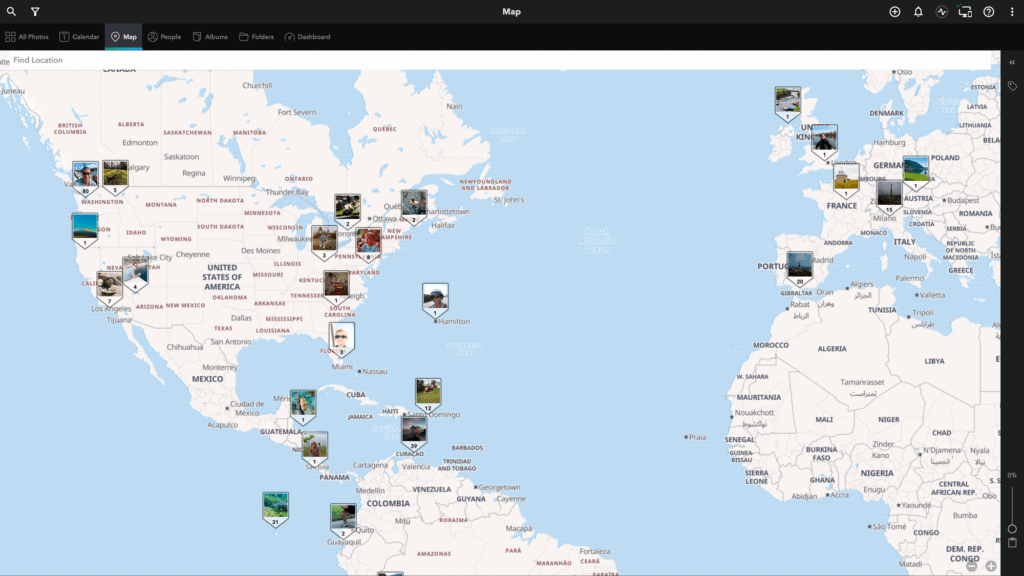
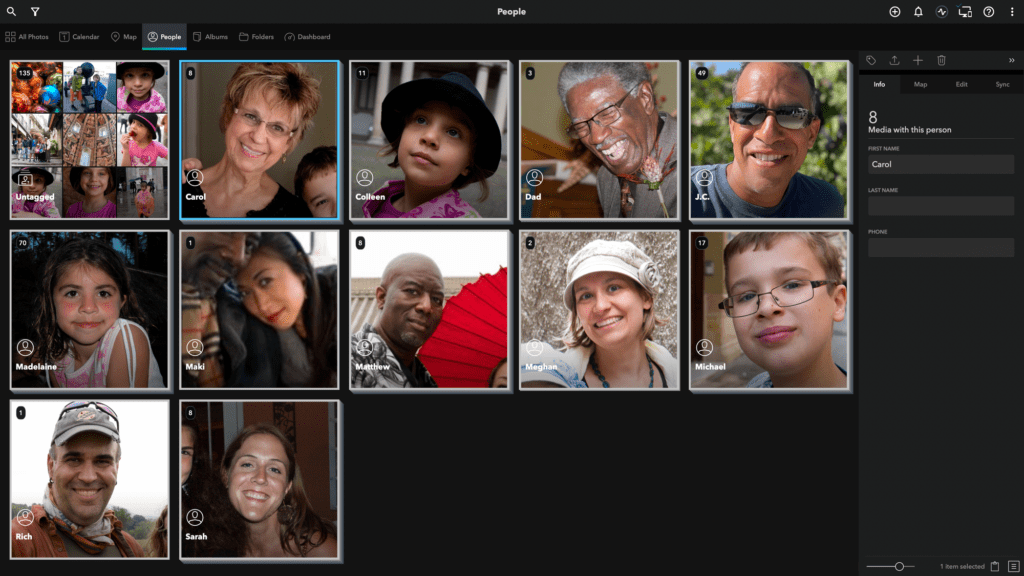
Basically, do one import at a time. Such as one memory card at a time, or one folder of images at a time. There is a lot that Mylio is doing in the background, it is not just making a listing in your catalog, but Mylio also does some other work on your files so it is ready for the Face Recognition, De Duplicating, creating previews, creating thumbnails and putting your images on the Map to name a few that I know of

You should be ok having multiple vaults and multiple devices to start

If you choose an existing folder as your Mylio Library Folder

This is the scenario that I fall into and can give you some advise base upon my experience

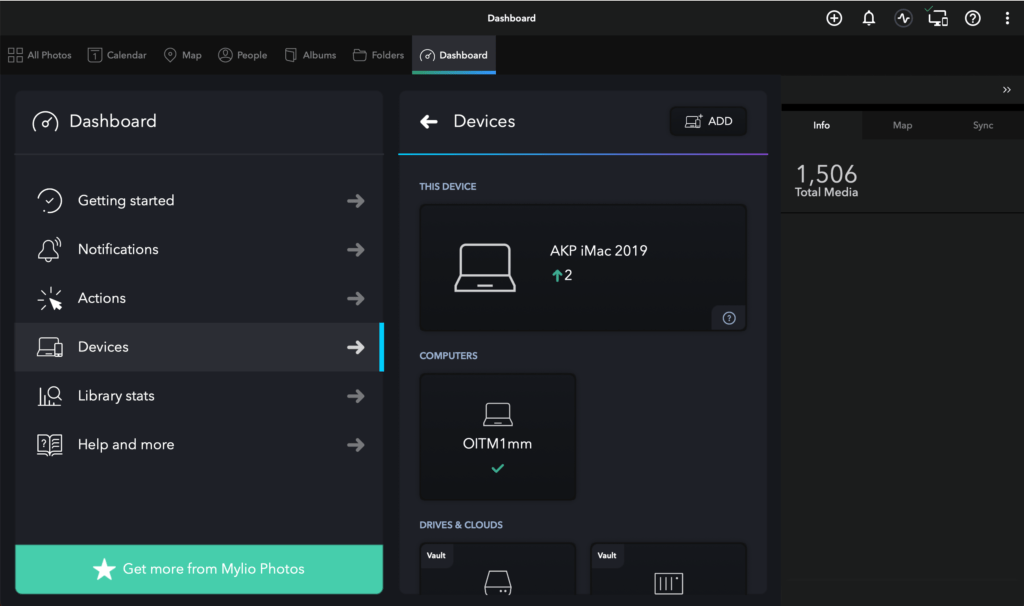
After you set up Mylio you should have 2 devices, 1 being your computer and the other being your Vault where your Mylio Library is located. Be that your internal drive or external drive (PS recommend external)

You might be tempted to add your other devices right away such as your phone or another computer. HOLD OFF on doing this.

Depending upon how large your existing library of files is, the initial import into Mylio will take some time. Be prepared for that. As mentioned above, it is not just a matter of putting a listing for an image in your Mylio catalog, but many other things are done as your images are imported.

The larger your library the longer it will take. Mine for example was ~ 182000 images that take around 3 TB of space on my external drive and it took a weekend on my 2019 iMac to finish the initial import properly.

By not adding other devices to your Mylio setup until this is finished, it will speed up the process as Mylio doesn’t have to deal with the other devices during this initial import. That was part of my problem, I couldn’t help myself and I added a second vault right away along with some other devices. And as a result, my initial import took much longer as it copied information to the second vault and to my other devices along with my primary computer and vault when it was adding images to my Mylio Library catalog.

So to the point, after the setup of your computer and 1st vault, let things go until your Mylio Library is all in synced and happy, then add another device, let that sync up, then add another vault if you wish, and let that sync up, etc. Each time you add something, let that sync up completely before adding another. Non Vault devices should be pretty quick, but adding another Vault does take some time.

Once you have slowly added all your devices that you want in your Mylio environment and things sync up across all of them for this initial setup, anytime you add more images it will be much faster to sync to your vault(s) and your other devices as they are connected.

For those Mac OS folks who had been using Apple iPhotos

I have been a long-time Mac OS user and as such have some old iPhoto libraries that still have images that I wanted to import.

I discovered that Mylio didn’t recognize them when I when to add them via the option to add Mac OS, iPhoto, and Aperture option. I believe this to be the fact that these are very old libraries and in a format that Mylio does not recognize. (I have not yet confirmed this with Mylio). But I did find a workaround to make these libraries show up. It will require double the space that your iPhoto Library takes as it will make a copy.

I would open the old library, it would open the current version of Photos and start converting. When it was done and I quit photos I would see two libraries with the same name. One was the new Photos format library and an iPhoto merged library. I would go back to Mylio and choose to add the iPhoto library and low and behold, the iPhoto Merged library would show as being available. I believe that this is due to the format of the iPhoto Library being migrated to the latest iPhoto format before it was converted to a Photos library.

Doesn’t really matter to me what is happening behind the scenes, I just know with this method I can now import this very old iPhoto library into my Mylio Library

If you are a long time Mac User and have images prior to Mac OS X

I am a long time Mac User and I discovered one issue for my images that I had taken before Mac OS X (yes back in the Mac OS 9 days). Those images did not have an extension as part of the file name.

Although Mac OS X does recognize them as images, Mylio was not as it seems Mylio relies on the file extension. So I had the situation where I had images in a vault directory, but they were not showing in my Mylio catalog. This applies to any Linked folder as well.

So the work around it to give your files an extension for the type of image they are. You can do that using the Mac OS Terminal.

  • Locate your images that do not have extensions. If you have a folder that has some with an extension and some without, create a new folder in that same folder and move all the images that do not into that folder.
  • Open the Terminal Application. Found in applications -> utilities
  • type cd and add a space.
  • Drag the folder icon onto the terminal window. This will add the folder file path in the terminal window. Press return. You can also type it as well, but this is a much easier method especially for long file paths.
  • You should now be in the folder that has the images to have an extension added. Yow can confirm this by typing pwd to show the folder path. And doing an ls -l command to show the files
  • Next, you will use the following command to add a JPEG extension to your file names. Just copy and paste the below command. Pressing return after pasting to execute.
    • for i in *; do mv “$i” “$i.jpeg”; done
  • If you have tiff images, the command is similar, just a different extension in the command as shown below. Remember to press return after pasting in the terminal window to execute the command.
    • for i in *; do mv “$i” “$i.tiff”; done

If you make a mistake and accidentally add the tiff extension to Jpeg file types or vice versa, it is easily fixed.

  • Changing the extension from .tiff to .jpeg us the following command in the terminal while in the folder
    • for file in *.tiff; do mv “$file” “${file%tiff}jpeg”; done
  • Changing the extension from .jpeg to .tiff us the following command in the terminal while in the folder
    • for file in *.jpeg; do mv “$file” “${file%jpeg}tiff”; done

Of course, if you have a different extension, the above command work, you just need to change the .tiff or .jpeg to the extensions you need.

Once the extension has been added, Mylio will automatically add the images from these linked folders to your Mylio Catalog.


If you found this post and have not yet tried Mylio, click the button below to get started. You can also click it to get the subscription to add more devices or more than 5000 images that are available in the trial/free version.

By using this special link you will receive the affiliate discount offer that is only available to affilate members

Mylio Text Logo

Mylio – One Catalog to rule it all

For a long time now I’ve been trying to find the right program to catalog all my photography ever since my first photo editor with a Catalog (Apple’s Aperture) was no more.

I have finally found the affordable solution that I have been looking for.

Before I get into the program itself, I just wanted to give a few things that I was looking for in a cataloging program.

  1. It must be able to hold all of my photography and videos. All the various file formats that I have from Nikon, Fujifilm, and since I’m an Apple person, the Apple file formats like HEIC.
  2. It must be quick to load when viewing the catalog. I don’t want to open the application and have to wait minutes for the catalog to process and open to view
  3. It must be Mac OS compatible since that is what my computer platform of choice is.
  4. It must do keywords, Albums, and view and edit metadata of the image as I do my best to keyword and organize my images.
  5. Rate, label, and flag images as needed
  6. My images can be accessed by any of the photo editors that I use
  7. It must create a backup of my catalog. You always need a backup
  8. A way to view my photos on a Map. I’m a visual person, so I want a way to look at where my photos where visually
  9. Has to be affordable

I’ve tried other platforms to solve my problem from various photo editing vendors that have a catalog as part of their application, but none fully solved my problem. They all suffered from varying degrees of slowness as I opened the programs it opened my library of nearly 300,000 images. A few programs were not bad on opening and were bearable, but then when I would close the program, there was a long delay while it processed the catalog.

The only programs that said they would do what I was looking for were designed for large business use and cost thousands of $

Mylio Photos

And then I was introduced to Mylio Photos

Mylio has filled all my requests and more.

In my view, Mylio is first a cataloging application, but it does also have editing capabilities. So not only can you use it to catalog your photography, but you can also use it to edit your as well photos (more on that later)

I will say that I will primarily focus on the Cataloging portion of the program since that is my primary interest in this application. I’ll cover the editing and other non-cataloging features in detail in a future post.

Since this will be a long post, let me put a link to their website now so you can refer to it later for more details. Psst, there is a free level too…. See info on that and how you can get a special 25% discount on Mylio Photos at the bottom of this post. (You must use the special link at the bottom of this post to get the 25% and this is a limited-time promotion)

For those who are visual, check out my Youtube video as I’ll cover most of the same content in this post in that video.

Features of the cataloging function of Mylio Photos

Features that I was looking for in a cataloging application for my photography

  • File Formats – Check. Covers my Raw format camera and my Apple formats (This program reads most if not all image formats along with document formats) Click HERE to see the supported formats
  • Keywords, Album, and metadata – Check. Note that Metadata editing is limited to the most commonly used fields. And you can show more EXIF data about the image. You can also add and edit an IPTC card that has your information and copyright information. There is a toggle to turn on viewing this for an image
  • Rate, label, and flag – Check.
  • Quick to load – Check.
  • Available for Mac OS – Check. (the program is cross-platform and device. Covers the most common devices) Click HERE to see the platforms supported and system requirements
  • My images can be accessed by any of the photo editors that I use – Check
  • Backup catalog- Check. Backs up the catalog and images.
  • Has a Map view – Check.
  • Is affordable – Check

Features that I call bonus features as they go above and beyond what I was originally looking for.

  • Can sync images from my phone. Before I was exporting the images from my phone or Photos on my Mac to import into my catalog. It works for both iOS and Android
  • The ability to see your entire library on all devices. With my other solutions, I could see only what I shared. It was never the entire library and it wasn’t across all my devices at the same time. There has been many a time I wanted to show someone an image, but it wasn’t one of the images I was syncing or had in my iCloud Library.
  • Can create multiple backups of my catalog and full-resolution copies of the images in that catalog via Vaults to multiple locations.
  • Can import from Facebook, Flickr, and Google Photos directly into your catalog
  • Import from Hard Drives or other storage media
  • and of course import from Camera and SD cards.
  • Your source files do not have to all be in one location. Although I am merging mine into one large external drive, you don’t have to, you can have your images wherever and on whatever media the Mylio can see and add those images to my catalog. You will have all the functionality of Mylio even with offline media as long as your vaults are available.
  • You can add documents to your catalog. So Mylio not only covers your photos it can be used for documents as well. Although I do not plan to use this feature
  • OCR. Mylio will index all text in the document and in your photos so you can search for any text shown.

There are many many features in this latest Release of Mylio Photos and I’m new to the program so I’m sure I’m not listing them all.

The overview of Mylio Photo

This is your cataloging application. Use this to catalog your images and then use your favorite Editor or Mylio to edit your photos. Let the apps do what they do best.

Supports almost all modern devices as Mylio devices so you can view, edit and access all your images on all your devices and have those changes quickly show up on your other devices.

Built-in backup of all your images via Vaults. The more Vaults the better the backup

You can edit, search, keyword, and organize how you like, this program is very flexible and you can organize more than just photos.

There is a lot to this program, so I’m going to have follow-up posts to cover smaller chunks at a time. But here are a few highlights.

One important fact, this is NOT a Cloud service. All your photos live on your devices. You do have the option to add a cloud service as a Vault, but it is not required.

And for those who have a slower internet connection, all the syncing is peer to peer, meaning if all your devices are on your home network, the syncing between your devices occurs just on your home network. No uploading via the internet and back down to your devices.

The Mylio Dashboard.

The Dashboard is the entry view to give you an overview of your Mylio environment to see how everything is doing.

The Mylio Photos Dashboard.

Calendar view

At first, you may say, calendar view, ok nothing too special there. But unlike other programs that can show you events based upon searched dates, this one shows it to you on a calendar. Not only does it do that, but if you connect it to your computer’s calendar, it can look up events on your calendar and match it up with the dates of your phots and show that event on your calendar.

In the example above from Washington DC, I was viewing the calendar view in the year view, and in the year 2016, I went to the Cherry Blossom Festival. My calendar entry for that was labeled “Cherry Blossom Peek in DC”. So Mylio saw the dates of my connected calendar and added the event automatically. Now if I click on that event in the calendar view, it takes me to all the photos that I took at the Cherry Blossom Festival that year.

Other ways to view your images

Overview of each of the views above

  • All Photos view – This shows you all the photos in your Mylio Library and lets you easily scroll through and view the photos in your library
  • Album View – Let’s you group your photos into any grouping you like. There is also a Category option not shown. Albums are for more specific groupings, Categories are for more general. An example would be The category of Travel and then have albums for each individual trip.
  • Folder View – This shows the folder structure of your Mylio Library. This is the same folder structure you see in your OS if you viewed it via your operating system.
  • Map View – For any Geotagged images you have in your library, you can view them on a Map of the world to see where you have taken your photos. For images that are currently not geotagged, it is very easy in the program to add that information
  • People View – View images that have been tagged with the faces of people. Mylio does an excellent job of finding people in your images and letting you identify them. If you have identified a person in around 4-5 images, that is enough for Mylio to search the rest of your images and find that person in more of your images. You will then be able to confirm that they are the right person.
  • Not Shown, the Search panel. Mylio has a search bar where you can search for images in a variety of ways.

More details on each of these views in a future posting.

Photo details

Image with the Info Panel

Of course, we all like to see some details of each photo. Mylio shows this when you select an image and click on the info panel for that image. You can see the technical details about the image such as the camera and lens used, the filename, the date created, and more metadata. Some of which you can add your own information or modify what exists.

Editing

Mylio has basic editing features as part of the application and here is a sample of the options. I will go into detail on editing in a future post.

Partial view of the Editing option

The Open with Option

This is one feature I’m going to use a lot as I prefer to use photo editors that do a bit more than what Mylio currently can do. Here is an example of some of the applications you can open from within Mylio, and it will send the image that you had selected when you choose the Open with to that application.

Your Open with menu will differ depending on the apps you have. And if an app isn’t in the menu, you can always choose other

Now, what Mylio is not good for in my opinion

Printing

Mylio is not the program I would use for printing as the printing options are limited. For starters, it appears that the max print size is 8 x 10. and it is basic printing options. More advanced printing options such as color profile etc are not included.

For the average home user, this might be enough, but I print much larger prints for my Art Shows, so this is a no go for me and I’ll continue to use my other programs for printing my artwork.

For editing it’s ok, but I’ll still be using other programs as mentioned above.

The program has the basic editing tools that most folks would want to use including presets (you can create your own), an auto adjustment, white balance, Tones, red-eye removal, a basic brush tool, and a details tool. You can also compare your before and after images and see the histogram. It does edit RAW files for those supported cameras and if you take RAW and jpg and have both images, you can select which one you edit. But for more advanced editing you will need an external program.

How to get Mylio and a special discount

Mylio is free to download and use on up to 3 devices and 5000 photos. So you can always download it and try it out for free.

After that, there is an unlimited number of devices and an unlimited number of photos subscription that you can purchase for a monthly or yearly fee.

As part of their Mylio Photos 22 release, they are offering those who requested it on their website a 20% discount on their subscription. But since you are one of my readers, I can offer you a 25% discount on your subscription purchase. I’m assuming this extra discount they are letting affiliates provide is for a limited time, but they have not said one way or the other. So if you are considering it, purchase your subscription at the discounted rate. There is a 30-day money-back guarantee.

Click the button below and you will automatically receive your 25% discount.

The offer expires on June 22nd, 2022 (has been extended), but you can take advantage of the offer now and change your mind with the 30-day money-back guarantee if needed. But I don’t think you will as this is a great app

Note: you must use the button above to get access to the special 25% off offer. After creating your login, or logging in to your account after using the above link you should see the following button on your account page.

If you do not because you either refresh the page or when to another link, come back to this page and click the link again to see the 25% button on your account.

When you click the button you will be sent to the account signup page to create your Mylio Account if you do not have one, or you can sign in to your existing account. By creating an account you can download the software and try it in the free mode for up to 5000 images and 3 devices. If you decide to use the free version for a while, you can still come back to my page and click the 25% discount button above, and then log in to your account to get the discount when you decide to upgrade.

Or if you just want to learn more, click the button below but don’t forget to use the above button to create your account and get your discount.

Mylio courses

Mylio has started generating courses for their app. As of this writing, they have an excellent Mylio Photos Fundamentals course that covers everything you need to know to get started with Mylio. Click the button below to go to their course site.

My quick thoughts on this program

I’ll admit, I’m a fan of this program and look forward to using it to organize my mixed-up photography storage and get it all organized and easily accessible from all my devices. I like it so much that I’m breaking my usual rule of not purchasing subscription software. I fully believe the price to be worth it to be well organized, easily searchable, viewable, and modifiable on all my devices. I think you will like it too.

Disclaimer: I may affiliate with a product mentioned on this page. As a result, I may receive some compensation from the vendor. This affiliation does not influence any of my commentary on any product that I may write about, nor does clicking on the affiliate links cost you anything, in fact, you may save some money.

Look for more specific feature articles and videos to come from me.

The Sky replacement craze

Although the ability to replace skies has been doable for years, up until recently it required some serious Photo editing skills in either Photoshop or other editor of yours choice.

Now it has come to the masses via various programs such as Luminar AI and On1 Photo Raw.

I’m not saying it is a bad thing that the new programs make it easier so that everyone can do it, but I do think sometimes people do it just because they can. The Sun Rays phase was another good example of doing it just because it was there. I saw multiple photos where the adding of Sun Rays did nothing to add to the overall view of their photo. In some cases, it was actually rather distracting.

Now I personally do not replace skies in my images, yet, but I so see when there is a case for it. But that is it, I would only do the replacement if it is absolutely necessary to create the vision of the image that you want.

I can see one scenario when you might want to replace the sky is if you are on a travel trip or somewhere you know you will not be back for a while or you won’t be back to at all and the sky is very boring such as a cloudless sky. Then I would consider it since it is a case you would not be able to return to get a better sky.

But if you do need to replace the sky, pay attention to what is in the image and the over all view and the light of the image.

I have seen several shots in photography groups I belong to on the web where the tone of the clouds added does not match the rest of the scene. Such as the clouds are the warm color of a sunset, but the foreground is a cool color. Another bad placement is when you see the light coming from one direction on the ground and another in the clouds. (pay attention to shadows and bright spots). If you replace your sky you want to pick a sky that matches the rest of the scene in tone and in the direction of the light.

So before you jump on the sky replacement bandwagon, take a serious look at your image. Does it really need to have the sky replace? Asked yourself, will my image be enhanced by a new sky. Once you have decided that make sure to check that the tone and light direction of the sky you have chosen as a replacement match the rest of your image. Some software like Luminar AI can assist you with matching the tone of your replacement sky to the tone of your image along with helping with water reflections.

In short, don’t use a new sky replacement feature just because it is there, think about how the feature will enhance your photograph. That pretty much goes for all the other options that you have, just because it is there doesn’t mean you have to use it on every single photo.

Since this is just an opinion piece, I do welcome your thoughts, just leave a comment below Do you agree with my thoughts?. I only ask you to be courteous in your statements but all options are welcome.

OK, back to your regular scheduled programming as they use to say.

Meet Luminar AI Banner

Luminar AI Review Part 2 – Templates

OK, now that you have your images in LuminarAI via the Catalog, on to the next section.

Templates

Templates in LuminarAI are what use to be called Looks in Luminar. In other programs they may be referred to as presets. But basically they all do the same thing. They are a pre-set set of settings that you can apply to your image to give it a certain look.

Getting started with Templates. Select the image you wish to work in in the Catalog, then click the Templates menu at the top of the window will bring you to the Templates view

Templates in Luminar AI. The menus and sections
The Templates Section Layout

As you can see from the above, this layout has several sections, but the default view you are brought to is the Templates with the recommended AI template collections shown at the top of the Templates menu. Below the AI Template section are other categories of Templates that you may choose to use and those include.

Template All Categories Menu
The Template Categories of Templates that come with Luminar AI

The top right of the window contains the Template Collection that Luminar AI has recommended based upon the photo that you had selected. In my example you will note that it recommended the “Monochrome” Template Collection as one it things I should like to try with this image. I suspect it choose this collection first since this is a Black and White image. There are additional recommended template collections to the right of the Monochrome Collection and to view those, you swipe to see the additional recommended Template collections.

My Collection

The Star below the “Magic Wand“ as I’m calling it is the “My Collection” menu selector. In this section, you will see any templates that you have marked as your favorites, any that you have purchased via Luminar Marketplace, User Templates (Those that you have created yourself, Yes you can do that), and lastly, Legacy Templates. The Legacy templates are where you will find any templates you have from the previous version of Luminar that are compatible with Luminar AI. Most seem to transfer in my case, but any that use depreciated tools that are no longer in LuminarAI will not transfer and would not be shown.

My Collection Templates
My Collections Menu

I’m still deciding on my new favorites, I haven’t purchased any yet, and have yet to create any myself, but you can see I have several Legacy Templates to go through in my “My Collections” menu. I’m not sure yet if LuminarAI will use any of these in the recommended Templates yet, but I suspect not. My thinking there is the newer template collections probably have additional information as part of the collection that is used the AI when determining if it is a good fit. That and I have several templates that are shown in my Legacy Templates section that are good for Black and White images and they were not included in the recommend Template collections section. If I find out otherwise, I’ll update you here.

Template Collection

Once you decide on a template collection to use, you now get to choose the specific template from that collection. Each will have its own settings and a slight variation or adjustment, That’s what makes them their own template. but have the same general theme, thus the collection.

Template Collection Description of Menu/sections
Template Collection

Above is the view of the Monochrome collection that was recommended for my image. In this collection there are 5 templates. To see your image with each template, all you need to do is click on each template and LuminarAI immediately applies the templates settings to your image.

Be sure to slide the adjustment slider to see if your image looks better with a bit less of this template applied. This is one feature of LuminarAI and for that matter, other Skylum programs that I’ve always liked. When you select a template, the effect is shown at 100%. I’ve often found templates that I like but I sometimes do not like the effect at 100% so I just slide the slider to the left to back it off a bit.

And if you don’t like the template applied, you can select another, or just choose the Reset Adjustment to go back to your image without adjustments. You know if a template has been applied as the name of the template will show at the bottom right of the window. If no template is applied, there will be no name listed, just a grayed out “Your Template”

And out goes without saying, you don’t have to just use the template collection that the AI recommends, There is many more template collections included and you can always use on of the templates included with them.

Editing a Template

Now if adjusting the slider still doesn’t get you the look you want, you can still use that template as a base. Choose Edit in the template’s menu in the bottom right to see the adjustments made in this template and to make additional changes to get the look you want.

Editing a Template
Editing a Template’s settings

Now if you have made adjustments and really like the new look you have created and think you can use this on other images, you now have the option to save this base template with your adjustments as your own custom template. Note, the save button will only show up as being available if you have made your own adjustments. The name of the new template will be the name of the Template you used with the word Edit added. But if you go to the My Collection section and go to the User Templates section, you will now see your modified template saved in this section and you can rename it here if you want by choosing the menu on the right of the new User Template.

User Templates

We will get more into the whole editing section in Part 3 of the review.

My Thoughts on Templates

Part of the focus of LuminarAI is to make it easy to do things that use to take multiple steps or were complicated to do.

I think LuminarAI accomplishes this fairly well especially with the new AI template recommendation that is based upon it analyzing the your image and recommending which template to use. I think this recommendation is going to be very helpful to you especially if you start collecting templates. If it didn’t do this for you, you could end up going down a rabbit hole of trying to find which template may work best with your image. You could spend all your time picking a template instead of creating your work of art.. Just let LuminarAI make that selection for you and save some time.

If you are new to Photo editing, this feature will help you get the best out of your images without much work, but you don’t have to stop there. The templates are just a starting point. There is much more that this program can do for you. More on that in the Part 3 – Editing Review.

For me, I use the templates as a starting point. Either to give the overall picture a certain look before I go in and make minor adjustments, or to use as a base for creating my own custom template that I would apply to similar images.

How to update to or purchase LuminarAI

LuminarAI is offered in a couple variations as of this writing. There is a 1 Seat and a 2 Seat version.

What is meant by Seat? In short, each seat is each single installation of LuminarAI by device. So if you want to have LuminarAI on two computers you need to purchase the 2 Seat license.

LuminarAI 1 Seat – Cost is $79 before discount.

LuminarAI 2 Seats Cost is $99 before discount.

Don’t forget to use my LuminarAI Coupon Code of MARKDODD to save an additional amount when you purchase.

There is a 30 day money back guarantee from the time of shipping, which is currently set for December 15th, 2020; so if for some reason you are not happy, you can get your money back.

Please make sure your system is up to the task by checking it against the System requirements listed at the bottom of the product page. And yes, it does work with Mac OS Big Sur. But one note: LuminarAI is not yet been certified as of this writing with the new Apple M1 chip computers. I fully expect to be, but Skylum is still doing its testing on the new M1 chip hardware.

Be sure to check out Part 1 – The Catalog


Meet Luminar AI Banner

Luminar AI Review Part 1 – The Catalog

This review is based upon a beta version of LuminarAI, Skylum’s latest photo editor. As such some things may be a little different between the version reviewed and the final released version.

I have been a long-time Skylum customer, back even to the MacPhun days, and as such, I have seen their programs evolve over time. Some things I agree with, some I do not. I hope this to be an unbias review of their latest program LuminarAI.

What LuminarAI is and What it is not.

This is NOT an upgrade/update to Luminar 4. Despite having the base name, this is an entirely new program. Instead of just patching things in Luminar 4, Skylum made the decision to start from scratch with this new program. They, I believe, have taken the best of all their previous programs and some they acquired to make this new Photo editor that combines everything into one application.

This is NOT a cataloging program, aka DAM (Digital Asset Manager). Although you can view your images in what they have labeled a Catalog, in my option, this is more of a browser than a catalog. My view of what a catalog is is something that lets you tag, keyword, label, or add other metadata to your image. LuminarAI does not do this. There are many other programs that can serve this function well, those include Adobe Lightroom, On1, Capture One, ACDsee Photo for example.

Some initial comments

LuminarAI is intended to be a program for everyone. It has been designed for the beginner photographer and has options to add that level of user improve their image using AI but it also has the full set of tools a more advanced photographer would want to make more finite adjustments.

As part of this, LuminarAI is taking advantage of AI (Artificial Intelligence) that will analyze your image and make adjustments with little effort on your part. This seems to be a trend in photo editors, the AI bit, and I see this as becoming the norm for all photo editors. More to come on this in the part 3 review post when we get into editing.

In order not to have it be one very long post, I’m breaking it down into several parts. Part 1 will start out with the Catalog, Part 2 will be Templates, Part 3 will be Editing/Exporting

The Catalog

The Catalog in LuminarAI is quite functional for its purposes of letting you view your entire photo library. This is the view you are brought to when you open the program.

For you Luminar 4 users, important note, it does not open/convert your Luminar 4 catalog. When you open LuminarAI for the first time, it will ask you to locate your images so that it can create a fresh catalog of all your images. So, this is a bit of a repeat step but is necessary as they have written the catalog file to improve performance. At first, I thought this would be a bit deal, but after thinking about it what would I rather have done, have a new catalog that is much faster at responding and have to create my Albums from scratch, or have my albums with a slower catalog view. I’d take the faster catalog,

It has default items of All Photos, On this day, Recently added, Recently Searched (although this will only show up after your first search), and Trash (contains items you have trashed in LuminarAI, but they are not yet deleted from your physical photo library). Items are added when you select Move to Luminar Trash on any image.

There is a Folder section that shows what folders you have added to LuminarAI for it to show in your Catalog view. This folders section can contain 1 or many folders, and if you subfolders, you can expand the top-level folder to show those subfolders. The Albums section is where you can create your own Albums to help you organize your images locally or any other way you would like. It doesn’t physically move the image on your computer but lets you group images together in any way you would like.

It has a built-in search function that does let you search but image or folder name, date, or extension to help find your images wither they be in a folder, Album. Once you have found your image, you can see a bit more metadata of the image by clicking the little “i” icon on the bottom left of the Luminar window to show basic metadata information about the image, such as filename and extension, the ISO, Focal length, EV, F stop, and the shutter speed of your image; the date/time, dimensions, and file size of the image; and lastly the device it was taken on including the lens.

The interface

How to update to or purchase LuminarAI

LuminarAI is offered in a couple variations as of this writing. There is a 1 Seat and a 2 Seat version.

What is meant by Seat? In short, each seat is each single installation of LuminarAI by device. So if you want to have LuminarAI on two computers you need to purchase the 2 Seat license.

LuminarAI 1 Seat – Cost is $79 before discount.

LuminarAI 2 Seats Cost is $99 before discount.

Don’t forget to use my LuminarAI Coupon Code of MARKDODD to save an additional amount when you purchase.

There is a 30 day money back guarantee from the time of shipping, which is currently set for December 15th, 2020; so if for some reason you are not happy, you can get your money back.

Please make sure your system is up to the task by checking it against the System requirements listed at the bottom of the product page. And yes, it does work with Mac OS Big Sur. But one note: LuminarAI is not yet been certified as of this writing with the new Apple M1 chip computers. I fully expect to be, but Skylum is still doing its testing on the new M1 chip hardware.

LuminarAI Review Part 2 coming soon


Mass Watermark Logo

Review of Mass Watermark

Have been given the opportunity to review Mass Water Mark for Mac and Windows OS. Disclosures: I have been given access to the software, but other than that I have no affiliation with the software vendor.

I’m not one to usually watermark my images and I will not get into that debate here as to why or why you wouldn’t want to watermark your images. But for those that do and need an application to watermark your images, this may be your solution, especially if you are a Windows user.

Features and notes on each platform version

The features vary between the Mac OS and Windows versions at the moment with the Windows version having the full feature set.

Windows Features

  • Add Text or Image Watermark to a collection of Images
  • Batch Resize Images to meet Web standards
  • Retouch your Images before Watermarking with Image Optimizer
  • Create your own Branding Watermark with Custom Text and Custom Logo
  • Image Optimization – Adjusting Contrast,Brightness etc
  • Direct upload to Picasa or Flicker
  • Add EXIF information
  • Watermark Designer built-in
  • Crop/Rotate/Resize the image and the image for a watermark
  • Create a Zip file.
  • Improve Image Quality by applying effects like Mean Removal,Sharpening Etc
  • Can export the watermarked image as jpeg, png, bmp, gif, or tiff. It does have an option for the original format if you want to keep it the same as the imported image.

The windows version of this app is full-featured app for creating watermarked images as well as a way to mass resize images. It can import jpeg, png, bmp, gif, or tiff images.

Below is the Mass Watermark interface. You have quick access to all the features in this one interface. The top left is where you import the images to be watermarked, the top right shows a preview of the selected image with the watermark. The bottom half is where you enter your text, image logo, and choose your various options

Windows Mass Watermark app interface

Below is the Watermark Designer interface where you can make your custom watermark with text, logo, or both and resize the logo image if needed. It lets you select the font size, type, and color and you can set options such as have the logo appear overtop of text. Once you have created your watermark, you can bring it right into the app or save it to bring into the Mass Watermark interface as a logo.

Watermark Designer Interface

Since my logo is usually a large format image I needed to scale it down and the Watermark Designer handled this very easily.

Another option under the top right section is the ability to do a quick optimization of the image. Below shows the basic editing options you can do with this app when you click Optimize.

Now that I’ve created my watermark with the Watermark Designer I have brought it into Mass Watermark and showing a preview of a watermark on which I added text and a logo. It is showing large and not transparent for easier viewing as an example.

Interface showing text and logo watermarks

Watermark Designer to create a custom watermark with a logo and customized text. I did save it for future use, but if you click the use as watermark and you will be sent back to the Mass Watermark interface and see it as a preview of one of your current images. If you choose to save it, to use it in future watermarking, you would choose the save image in the open image logo section to bring it back in. Here is an example of a custom watermark created with the WaterMark Designer.

Now in this is the interface showing the custom watermark that I created above with the Watermark Designer. Once it is in the Mass Watermark app and you want to move its location, you can double-click on the preview and it will present you with another window where you can click and manually move the watermark’s location. You could also use the logo positioning options to autosize the image, make it transparent, and choose a position. Keep in mind that the location applies to all the images you export. So take that into consideration when you position it and when you are creating it. For example, in my sample images, if I had chosen the black text for my solar eclipses images you would not see the text.

Once you have set all your options and positioned your watermark, just click the WaterMark Images button. You will be prompted on where you would like to save the watermarked images via a standard windows dialog box. Selection your location (I recommend creating a new folder) and away the program goes rendering your watermarked images. Below I show one of my images with a custom watermark. Again, I left it large and none transparent for easier viewing as I would make the watermark smaller and transparent as not to take away from the image.

Example Watermarked Image.

One note: as in my example above I have the solar eclipse image as both a jpg and tiff image in the import folder, the program is smart enough too realize that this is the same image and when applying the watermark and saving the resulting images, it only saved one version of this image. This can come in handy if you have a folder of images that you are bringing and you didn’t realize you have multiple formats of the same image

The Windows version of Mass Watermark is a fully featured program that lets you create custom watermarks, position them, and apply them to as many images as you want. If you are looking for an easy way to do this and are Windows users I can recommend this program-

Mac Features

  • Add Text or Image Watermark to a collection of Images
  • Batch Resize Images
  • Create your own Branding Watermark with Custom Text and Custom Logo
  • Can export the watermarked image as jpeg, png, bmp, gif, or tiff. It does have an option for the original format if you want to keep it the same as the imported image.

The Mac version is missing most of the features you find in the windows version. It does function as a mass watermarking and resizing app with some caveats mentioned below.

It can import jpeg, png, tiff formats. It does not import HEIC format which is one of the formats from your iPhone. You will have to convert it to regular jpeg first.

The interface is rather dated and it does have some limitations such as you cannot resize the window to take advantage of your larger screen sizes. This is still version 1.0 and was written in 2015.

I have been testing it under Mac OS 10.14 and it does run. It will open two applications, one is the Mass Watermark app that has the app menus and the other is the interface showing up as MassWatermark. This does make things a little confusing. Shown below are the two dock icons that show for this app and the Mac Interface.

As with the windows version, you can enter your custom watermark text, change the font and size of the text, choose the placement of the text, select a watermark logo image, and place the position of the logo image.

If you are going to use an image for your watermark, you will have to resize the image outside of Mass Watermark before you bring it into the app. If not, depending upon the size of the image, it may fill the image with your watermark depending upon the resolution of your watermark image and the image you are watermarking.

To enter your license key in the Mac version it is not obvious as there is not a menu option, you have to open the app then click the close button on the interface app and you will get prompted with the below dialog where you can enter your license key, buy the app, or quit the application.

On occasion, I have had and issue with some of the menus in the menubar of the application disappearing, but if you quit and reopen the app they come back. This is a 32bit app, so mac OS 10.14 will be the last version that can run this application as with the next version of Mac OS you can only run 64bit applications. I have been informed by the vendor that they have plans to redo of the software and I expect it will get the same features as the Windows version and be compatible with the current Mac OS at that time.

In short, though, I cannot recommend the Mac version as a whole, but if all you want to do is a text or image watermark it may work for you. I would recommend waiting on the new release when it comes out.

There support section has a complete video library on how to use all the features for the Windows Version

Price as of this review is $30

Making your Apple Aperture Photos available to Luminar 3 with Libraries

While reading posts about Luminar 3 with Libraries I saw several questions about how us older Aperture users could get our photos into the new Luminar 3 with Libraries. So I decided to create this short video showing you how.

If the video doesn’t load form some reason you can access it here. https://www.markdoddphotography.com/recommends/aperture-to-luminar-3/

#aperture #luminar3 #video #howto


Recommended Book for Photographing D.C.

Book Recommendation Snap D.C. by Angela B. Pan

I would recommend reading it through as it is a quick and easy read. Once you have read it in its entirety I’m sure you will start planning your D.C. photography trips and use this book as a reference guide for your trip and future trips to D.C.

Angela goes over the locations she recommends in the National Mall area, but also includes some lessor know locations near the National Mall that are great photo opportunities. Even has a few that are just outside of the D.C. area.

She includes transportation information, the best time to shoot at the location, some of her photography from that location, and imparts some local knowledge of the area.

If you are planning a photography trip to Washington D.C. and want to know the best times to go to a location, how to get there, and how to get a different photo that everyone else in D.C. then this book is for you.


Currently sold only through Amazon. You can get your Kindle or Paperback


Get your copy of SnapDC


Image of the Day

Here is an image that I took of the Cherry Trees using one of the tip locations she mentions in the book.


#SnapDC #amazon #affiliate #book #washingtonDC


light tent

Review of the LimoStudio 16″ x 16″ Table Top Photo Photography Studio Lighting Light Tent Kit in a Box

The LimoStudio 16″ x 16″ Table Top Photo Photography Studio Lighting Light Tent Kit in a Box,  Model AGG349


I was looking for a way to photography items that I am posting on eBay and didn’t want to spend a lot of money to get a professional lightbox. This item fits the budget coming in at around $40.


The kit comes with everything you need for photographing smaller items.


This is what comes with this light tent:

  • Contents: 1 x Mini Stand Tripod / 1 x White Photo-shooting Tent, 16-inch Cubic with Color Backdrops / 2 x Table Top LED Light / 1 x Cellphone Clip Holder
  • Red, black, blue, white backdrop fabrics included
  • LED light stand specifications: 5500 Kelvin / 600 Lumen / 120° Beaming Angle / Maximum Height, 9.5-inch
  • Table Top Mini Camera Stand: Height adjustable with max 8-inch tall / 1/4-inch standard screw tip
  • Cellphone clip holder is compatible with any smartphones


The kit folds down flat

It as two pockets the outside in which you can store the lights and the tripod with the clip. The extra backdrops to not fit in the pockets, but you can put them under the straps or just carry them separately.


Light Tent Folded


Here is the light tent all set up on my table and ready to start.

It is easy to unfold and put together. The top is attached to the side with a velcro strip. Not really shown in this picture, but the side may not lay exactly flat against the surface you place this on but does not hinder taking pictures in any way.

Light Tent Setup


The two lights have built-in tripod legs that will folder up into the light base for storage. Each light has its own on/off switch and is easily movable to get the angle that you need

One note not on the description on Amazon, but indicated in the manual that came with the product is that you should not use the lights for more than an hour at a time.

The phone tripod and clip are very basic but work for most phones. You will likely have to tighten the adjustment screw a few times as it not the best at staying tight especially if you angle your phone. You don’t have to use the tripod setup as the scene will be bright enough for you to handhold your phone or camera to take the picture.


Here is a sample image

I took this with my iPod and is the item shown above in the light tent. This is straight out of the iPod before any adjustments that need to be made. But for the most part, no adjustments other than cropping and maybe a little shadow boosting.

Light Tent Sample image


Stock view of the panels included.

They are what I call fake felt panels that have velcro attached to one end so you can attach them to the back of the Light Tent. Due to the material, the one drawback of these panels is that they like to collect dust. So try to use this product in a dust free environment. If they do get dusty, your standard lint roller will clean the backdrops just fine.

Light tent stock view of panels


In summary:

For the price, I couldn’t ask for anything more. The lights are bright and you have a selection of the three colors as backgrounds that look good for most objects.


You can get this item from Amazon


#amazon #affiliate #lighttent #Review


Some hopefully helpful advice on the 2017 Solar Eclipse.

I’m planning on driving to a location for the total solar eclipse this year and thought I would post what sites I plan to use and those I found helpful to me in planning.

First, I’d say, if you are a procrastinator like me you will need to get your accommodations.   Depending upon the area you are going to, more than likely all the accommodations in the direct center path area are already full.  Look for areas that are on the outer edge of the total eclipse shadow zone. You might still be able to find something there, but expect to pay top dollar at this point.  That is the situation I’m in, but I still plan to drive about an hour to get to the center of the shadow of the total eclipse.


Recommended Websites

To find locations that are within the shadow of the total eclipse, the best site I’ve found so far is.

Interactive Map from the greatamericaneclipse.com

By using this map, not only can you find a location within the total eclipse shadow, but you can see the length of time the total eclipse will be visible for that area. If like me, my accommodations are on the outer edge, you can see where you would need to drive to get more time within the shadow. For my case, where I’m staying it would only be in the shadow for a little over a minute.  Where I plan to drive to it will be 2min 38sec.

This is what the interactive map looks like for the area I’m going to.

The biggest thing that I found helpful was the blue time lines. Due to terrain and partly due to the moon’s surface, the time lines to vary a little bit. Notice the 2min 38-second line gets a little squiggly as it goes over the mountains.


For an overview on the eclipse check out the NASA site at

eclipse2017.nasa.gov

Here you can get the all important Saftey tips, the Science behind the eclipse, and find out about some events planned. And more.


For the photographers out there, so far, the best site I’ve found for tips on how to photograph the eclipse is at

www.mreclipse.com

Two particular images I’ve found useful are

  1. The size guide showing what the sun would look like using a particular focal length lens shown here.https://www.mreclipse.com/SEphoto/image/SE-DSLR-Scale1pp.jpg
  2. The Exposure Guide:


both of these images can be found in full artcile context at

www.mreclipse.com/SEphoto/SEphoto.html


The equipment:


No matter what camera you have, you MUST get a special SOLAR rated filter. Dark ND filters will NOT protect your camera. A lot of the solar filters are sold out, but it is still possible to get some at your favorite photography website like Adorama.com.

You will also need eye protection. Again, your favorite photography site like Adorama.com should have them. I happened to get my from another site and they are the paper version with the special Solar Rated shield.  You may look geeky, but you MUST protect your eyes. And I can’t stress enough, any other solution that does not meet the requirements of ISO 12312-2 for direct solar viewing should NOT be used.  There are many products out there and you need to verify that they meet this standard in order for you to look directly at the Sun during this eclipse.

Please verify this for yourself, but it seems if you are in the area of direct shadow from the full eclipse when the moon fully covers the sun, this is the short period of time that you can view the sun with the naked eye. You must wait a few seconds (say 15 to be safe) after the moon covers the sun to make sure you are in full darkness. And you must make note of how long the full eclipse will be for your location as you will need to put your eye protection back on before the sun peeks out the other side. (again maybe 15 secs before it is predicted to reappear to be safe)


What to do before the big day

Now that you have your location planned out, your Solar Filter and Eye protection, it is time to practice.

If you don’t want to start right out with practicing on the sun, practice taking pictures of the moon. Try out the various size lenses you have if you have that type of camera to get an idea of how big the sun will be in the image for that size lens.

After practicing on the moon, go ahead and practice on the sun with your filter attached and your eyewear on. Remember for the cameras with direct view finders such as DSLR’s, even with the filter on do not look through the viewfinder. The filter on your camera is designed to protect your camera and does not have the protection needed for your eyes.

Practice, practice, practice.

You want to get all the bugs worked out of your workflow or plan especially if you are going to change lenses during the event. You don’t want to get to the big day and miss the shot because you were fumbling with your camera during the short total eclipse period.

The one thing you can’t test for that I know of is the full eclipse. That is where the above exposure sheet will come in handy. But make sure to review, highlight, or do what ever you need to do to make note of what settings you will need during that time.

Not everyone is going to be in the total eclipse area, but a big majority of the United States will get to see at least a partial eclipse. This is the first total eclipse over the United States in some time so you don’t want to miss it.  You don’t have to stand out the entire time, but at least try to get out during the peak for your area.


Only slight plus on things is that if you totally mess up this time, take it as a learning experience for the next time a total solar eclipse comes to the United States in 2024.


And don’t forget while you’re taking pictures to stop and just take a moment and enjoy the experience. And have fun.


As soon as I get my own practice shots done, I’ll post them here so you may get an idea of what practice shots can look like.