

This review is based upon a beta version of LuminarAI, Skylum’s latest photo editor. As such some things may be a little different between the version reviewed and the final released version.
I have been a long-time Skylum customer, back even to the MacPhun days, and as such, I have seen their programs evolve over time. Some things I agree with, some I do not. I hope this to be an unbias review of their latest program LuminarAI.
What LuminarAI is and What it is not.
This is NOT an upgrade/update to Luminar 4. Despite having the base name, this is an entirely new program. Instead of just patching things in Luminar 4, Skylum made the decision to start from scratch with this new program. They, I believe, have taken the best of all their previous programs and some they acquired to make this new Photo editor that combines everything into one application.
This is NOT a cataloging program, aka DAM (Digital Asset Manager). Although you can view your images in what they have labeled a Catalog, in my option, this is more of a browser than a catalog. My view of what a catalog is is something that lets you tag, keyword, label, or add other metadata to your image. LuminarAI does not do this. There are many other programs that can serve this function well, those include Adobe Lightroom, On1, Capture One, ACDsee Photo for example.
Some initial comments
LuminarAI is intended to be a program for everyone. It has been designed for the beginner photographer and has options to add that level of user improve their image using AI but it also has the full set of tools a more advanced photographer would want to make more finite adjustments.
As part of this, LuminarAI is taking advantage of AI (Artificial Intelligence) that will analyze your image and make adjustments with little effort on your part. This seems to be a trend in photo editors, the AI bit, and I see this as becoming the norm for all photo editors. More to come on this in the part 3 review post when we get into editing.
In order not to have it be one very long post, I’m breaking it down into several parts. Part 1 will start out with the Catalog, Part 2 will be Templates, Part 3 will be Editing/Exporting
The Catalog
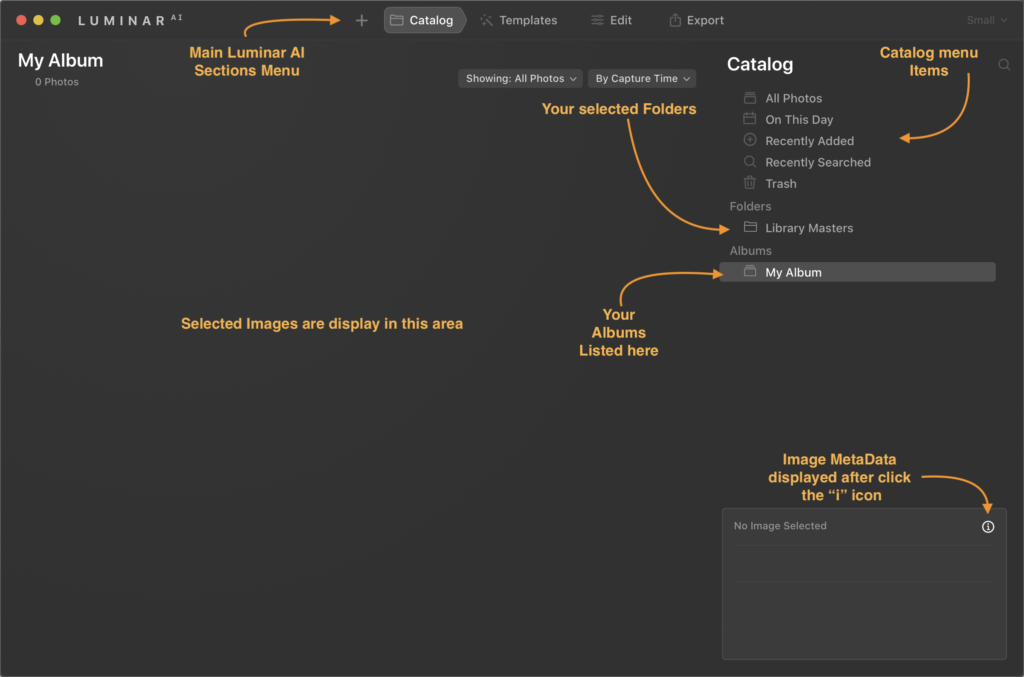
The Catalog in LuminarAI is quite functional for its purposes of letting you view your entire photo library. This is the view you are brought to when you open the program.
For you Luminar 4 users, important note, it does not open/convert your Luminar 4 catalog. When you open LuminarAI for the first time, it will ask you to locate your images so that it can create a fresh catalog of all your images. So, this is a bit of a repeat step but is necessary as they have written the catalog file to improve performance. At first, I thought this would be a bit deal, but after thinking about it what would I rather have done, have a new catalog that is much faster at responding and have to create my Albums from scratch, or have my albums with a slower catalog view. I’d take the faster catalog,
It has default items of All Photos, On this day, Recently added, Recently Searched (although this will only show up after your first search), and Trash (contains items you have trashed in LuminarAI, but they are not yet deleted from your physical photo library). Items are added when you select Move to Luminar Trash on any image.
There is a Folder section that shows what folders you have added to LuminarAI for it to show in your Catalog view. This folders section can contain 1 or many folders, and if you subfolders, you can expand the top-level folder to show those subfolders. The Albums section is where you can create your own Albums to help you organize your images locally or any other way you would like. It doesn’t physically move the image on your computer but lets you group images together in any way you would like.
It has a built-in search function that does let you search but image or folder name, date, or extension to help find your images wither they be in a folder, Album. Once you have found your image, you can see a bit more metadata of the image by clicking the little “i” icon on the bottom left of the Luminar window to show basic metadata information about the image, such as filename and extension, the ISO, Focal length, EV, F stop, and the shutter speed of your image; the date/time, dimensions, and file size of the image; and lastly the device it was taken on including the lens.
The interface
How to update to or purchase LuminarAI
LuminarAI is offered in a couple variations as of this writing. There is a 1 Seat and a 2 Seat version.
What is meant by Seat? In short, each seat is each single installation of LuminarAI by device. So if you want to have LuminarAI on two computers you need to purchase the 2 Seat license.
LuminarAI 1 Seat – Cost is $79 before discount.
LuminarAI 2 Seats Cost is $99 before discount.
Don’t forget to use my LuminarAI Coupon Code of MARKDODD to save an additional amount when you purchase.
There is a 30 day money back guarantee from the time of shipping, which is currently set for December 15th, 2020; so if for some reason you are not happy, you can get your money back.
Please make sure your system is up to the task by checking it against the System requirements listed at the bottom of the product page. And yes, it does work with Mac OS Big Sur. But one note: LuminarAI is not yet been certified as of this writing with the new Apple M1 chip computers. I fully expect to be, but Skylum is still doing its testing on the new M1 chip hardware.
LuminarAI Review Part 2 coming soon
