I’ve finally decided to take the plunge and migrate my Aperture and iPhoto libraries to Lightroom. The following will be a description of my experience and any tips I may have to help with the migration. For this test I will be migrating my Aperture library from my New Zealand Trip.
First, it was a tough choice to decide to migrate to Lightroom. I had held off until Apple released its Photos App to see if that would do what I needed. Now that it has been released, I’ve realized that if I want to continue with the post processing the way I would like to I would have to make the switch. Although Photos is a is a great app in itself and will suit many very well, for my purposes, it doesn’t have all the options I would like. I will miss the integration that Aperture and iPhoto had with my various Apple devices and each other, but I think it will be worth it in the end.
So before I began just diving in and doing the migration I decided to do some web research on the best way to do the migration. All the sites that I found agreed on a few points, some have more recommendations about keywords, but here is what I took out of them.
- This will be a slow process in that the pre steps take some time for the Aperture app to complete.
- Get your house in order before doing the transfer, that is to say, get things cleaned up in Aperture/iPhoto before you move. Again, this can be time-consuming and in my case will be, but I think it is best to do the cleanup in Aperture/iPhoto since I”m vary familiar with how they work and I will know what I’ve imported into Lightroom will be a clean import.
- The biggest recommendation seems to be to generate full-sized image previews in Aperture before migrating into Lightroom.
Since I’ve been using iPhoto and then Aperture over the years I found I had several different libraries for various projects a mix of general photos in both. I started the migration process by merging all the Aperture and iPhoto libraries together into one master library for each app of the general photos and left 2 Aperture libraries as it as I knew that were clean and I wanted to keep those project seperate. If your individual libraries are good and you want to keep them in separate Lightroom libraries this is not necessary, but for me, I had photos all over the place and wanted get ride of duplication and know what I had before migrating.
After doing the merging I proceeded to do a test with my New Zealand Trip Aperture library. So here are the steps I did
- Generate Full Resolution Previews.
- To do this in Aperture, Open Presences, select Previews, Change the Photo Preview to Don’t Limit, Select the Photo Preview quality at least 10 or higher.
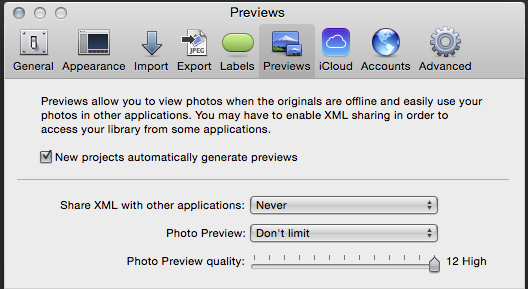
- After changing the preferences you need to actually generate the preview by going to the Photos menu and select it, then hold down the option key so that you change Update Preview to Generate Preview, then go down and select the Generate Preview to create the new previews
- This process even on a small 11000 image library did take several hours on my iMac. The speed will depend upon your library size, computers processors speed, memory, and hard drive speed, so results will vary.
- Also, it may look like Aperture has crashed, when in fact it has not. I use the Apple Activity Monitor to make sure something is still happening. Even in the monitor it may say that Aperture is not responding while it is building the previews, but if you keep and eye on the CPU usage and the I/O you will see something is happening. You just need to be patient and the task will eventually finish.
- Make sure you disable the shared connections before leaving Aperture.
- During my first import test I noticed I was getting pictures that were not part of my Aperture library. After looking at what they were I determined that they were coming from my flickr and other shared accounts that I had set up in this library
- For flickr and any other connection you have under the Shared section in Aperture, disable the connection so that you are not also importing these pictures into your new Lightroom catalog.

- Check your Aperture trash and empty if needed after disabling the shared services as photos that were downloaded, but not part of this library will be moved their when you disable the service.
- IMPORTANT if you have RAW + JPEG pairs.
- I discovered that this import script will only import either the RAW or Jpeg photos that have RAW + JPEG pairs but not both.
- As a result you will need to decide which format for those pictures you have as RAW + JPEG pairs to be imported into Lightroom. You can tell if you have any that are RAW + JPEG pairs but selecting Photos in your library then in the search box check File Type and select RAW + JPEG. This will show all the photos in the Aperture library that this will apply to as shown here
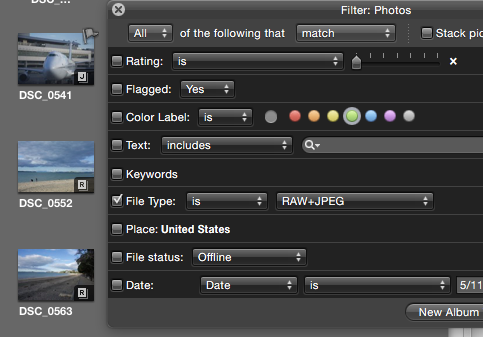
- You notice on the left there are images with either a J or an R on them. This indicates that the Original shown is either Jpeg or Raw. Once you decided on which format you want to transfer to Lightroom (and I would recommend the RAW) you need to make sure all the pictures have that format set as the Original as that is what Lightroom will import.
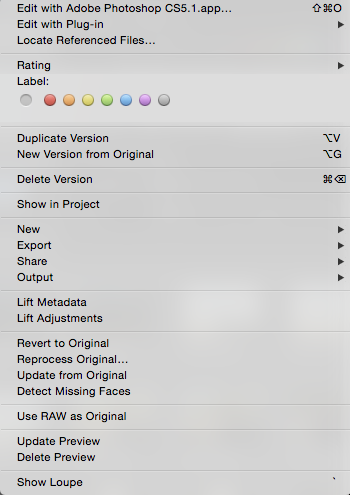
- So to to set your Originals to the format that you want, select all the photos and then right click on one of the images to bring up the menu and select Use RAW as Original. The menu is shown below, but this will change all the Original displayed images to be RAW format and Lightroom will import the RAW image. It will not import the Jpeg version.
- If you had imported the RAW version and how you would like to import the Jpeg version, it is possible. In this case you would go back into Aperture and set the Jpeg version to be the orginal image this time, then repeat the import process into Lightroom. It will take just as long if not longer that the first import as Lightroom checks each image to see if it is a duplicate. Since the Jpegs are not duplicates they will be added to your Lightroom library.
- Afterthepreviewswere generated,IopenedLightroom CC 2015 and started the import process
- For this test I choose to create a new Lightroom catalog by going to file and choosing New Catalog and picking a location on a hard drive that I knew had enough space.
- I went down to Plug-in Extras in the file menu to go and choose Import from Aperture Library only to find it grayed out as shown below.
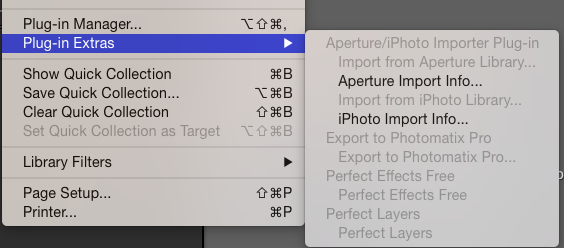
- TIP – My work around was to close this catalog and re open it. Once opened again, the Import from Aperture became available.
- Now that I’m able to select the Import from Aperture Library, I selected it and then worked through the series of Prompts.
- On the first dialog box you will need to select which Aperture library you are going to migrate along with the location for where the files will be copied to.
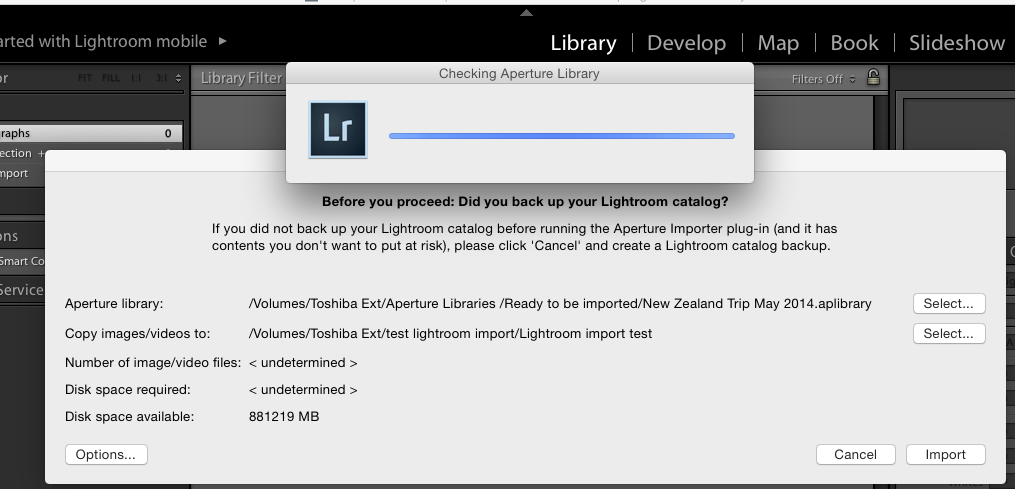
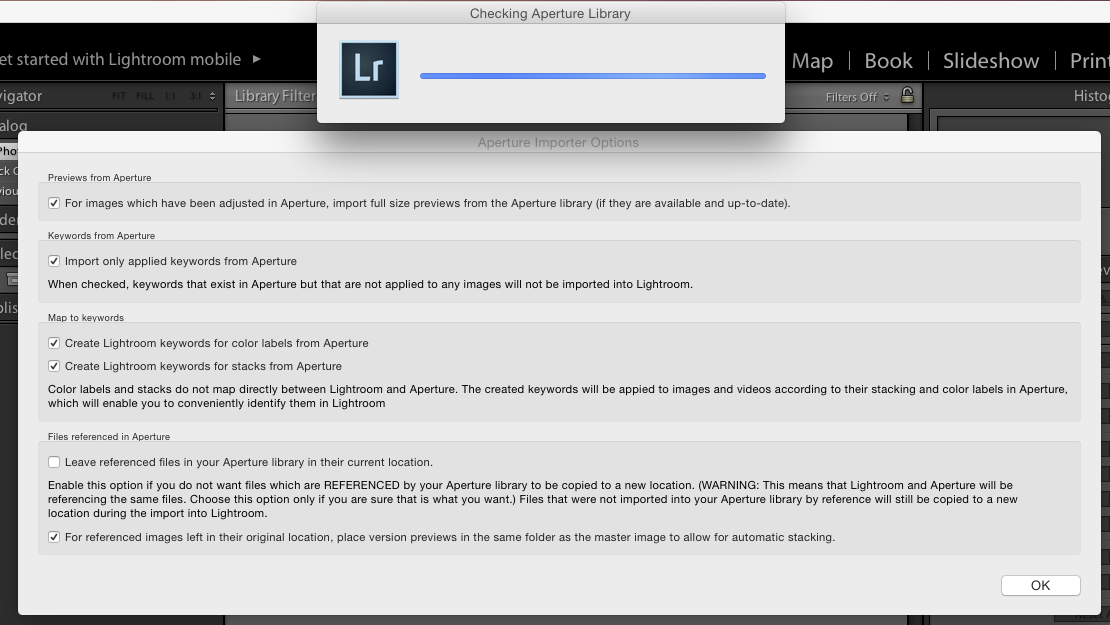
- Next, while on this dialog, select the Options button. On the options page, check the box on the line for previews from Aperture to import the previews that were generated in the previous steps.
- After clicking ok on the options dialog, you can click import after checking that everything is ok. Note it does show you how much disk space is required and how much is available on the destination so make sure you have enough space before clicking import
- You may get prompted to do reverse geocoding. What you do here is up to you, in my case I choose to enable it as I had geotagged all of my New Zealand trip photos to create a map in Aperture
- During the import you will see your status in the following dialog
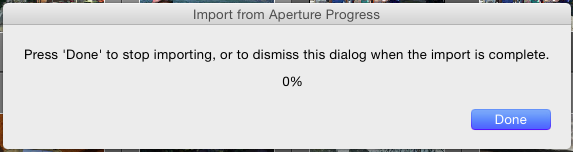
- Click done when the process has completed.
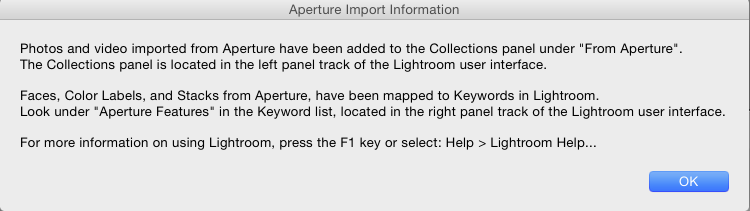
- You will be presented with the below information as a reminder of what was done
For my Aperture library that had 11966 photos in it it took about 4 hours to complete on my older iMac. During the import it said it was going to import 13301 files which is more than what was in my Aperture library so I needed to investigate.
Here is the view of my Aperture library
 Here is the file view in Lightroom after the import which shows the different dates for the photos.
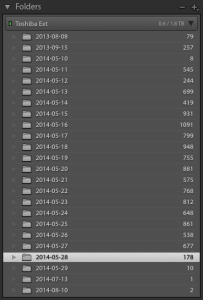
After reviewing the list I noticed I had some files from 2013 which were not part of my Aperture library. More on that in a bit.
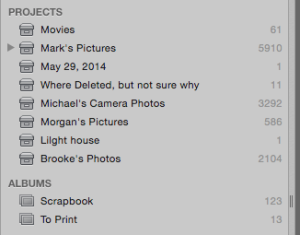
Here is a view of the Collections in Lightroom
 So between the two views I found some oddities with the import. I don’t blame Lightroom on this one, but Aperture. What I found was I had some extra photos added to Lightroom that were not part of my New Zealand Trip Aperture Library. After doing a little digging I determined that they were photos that I had shared via iCloud. Even though I had disconnected the iCloud connection these photos were still imported as part of the import. I suspect this was part of the reason the import took so long as it was downloading these from iCloud as it imported them. I’m not totally sure yet why this happened, but I suspect it has to do with Apertures iLife Browser support.
Next oddity shows up in the Collections. The import did put all of my New Zealand Library projects into a Collection called From Aperture, the Albums are correct, The Projects are correct, but the oddity comes in the Published Project section. Again, even though I had disconnected all my shared services it still showed the list of shared projects that I had shared on my flickr account and on iCloud. There are no pictures listed in each of these projects, just the list of projects themselves except for the 2 projects that I had shared on iCloud.
The projects that were imported show in the collection under their name, but the photos them selves show in a sub-folder of the project name called “Project Pictures” as show above for the two projects “Brooke’s Photos” and “Lighthouse”
Even though the import process imported more pictures that it should have and added extra items in the Collections, overall I’m please with the process. I would rather a process import more that it was suppose to than had it the other way around. I do have one mystery to figure out in that my Aperture library had 11966 photos in it and after removing the extra imported photos from iCloud Lightroom still shows 12390 photos as being imported. Did a little digging and confirmed the count difference is a result of the import process importing another image of any Aperture photos that were modified. In the finder it is easy to find these photos as they have “_Aperture_preview” added to the file name.
I consider these issue minor and the import test a success, but I would recommend keeping your Aperture library backed up someone just in case. Especially if you have RAW+JPEG images.
In summary I would say that I was pleased with the import results and if you plan and prep your Aperture library before doing the import I believe you will also be pleased with the results.
There are many sites our there thankfully and here are a few of the many that I’ve found useful when I was researching how to do the transfer.