iPhone Photos and Time Zones

I recently took a trip where I crossed several times zones and the international date line and here is what I observed how my iPhone 5 recorded dates and times with respect to the different places and time zones.

My trip involved 3 locations with 3 different times zones and one location being across the international date line. I assumed that with time zone support on that my iPhone would record not only the current date, but the time zone of where the photo was taken.  I found out differently after I uploaded them to my computer during my trip. I discovered this due to My Travel Photo Time Stamp Fiasco

I became curious when I noted that all of my iPhone photos had the EDT time zone indicated when I imported them into Aperture.
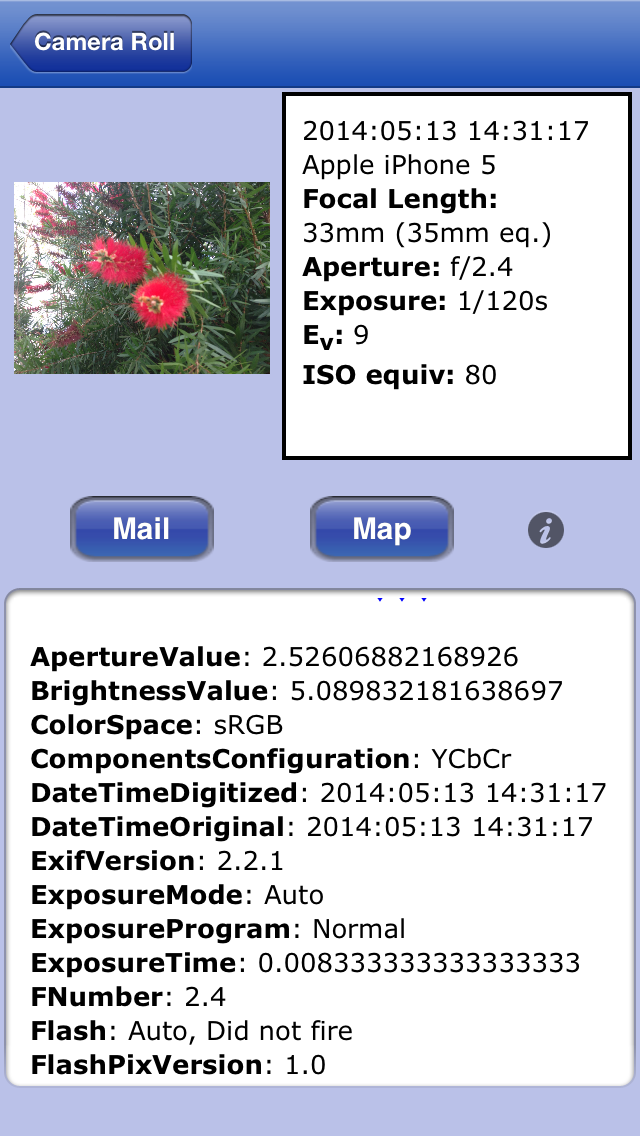
First, I’ve determined that the iPhone with iOS 7 only records the current date and time and not the time zone information. I confirmed this by using a free Exif application on my iPhone. The picture to the left is an example of a picture I took while in the GMT +12 time zone. Note that it does not show a time zone, but only a DateTime stamp. When I imported this photo into my Aperture library it showed with the date and time zone information of

2014:05:13 14:31:17 EDT

So where did the time zone information come from?
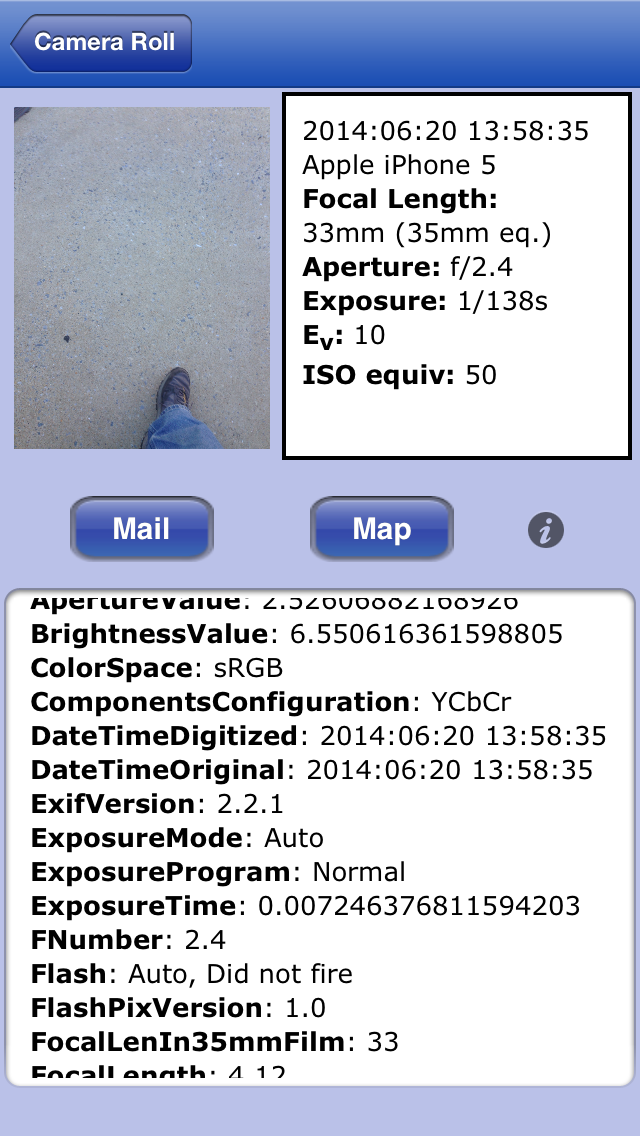


photo for Time Zone TestI did a little experimenting by using my existing photos and creating a few after setting the time zone on my phone. This is a sample photo that I took at 16:58 EDT where I had changed the time zone to PDT. It recorded the time at 13:58 which was the correct time for the PDT time zone, but again there is no sign of the time zone.  When I imported the photo into my Aperture library, Aperture shows the time as

2014:06:20 13:58:35 EDT

So why does it show as EDT time zone in Aperture even though it recorded it as the correct time for the PDT time zone?


Since the iPhone is not recording a time zone with the picture and Aperture displays time zone information on picture, Aperture adds the EDT time zone when a picture is imported. So why did it pick the EDT time zone?  Aperture uses the computer’s time zone information when adding the time zone to the photo and in this case, the time zone of this computer is EDT.

You can test this by importing a photo from your iPhone, then go and change the time zone of your computer and import the same photo again. The photo will show up with two different time zones but the same date and time stamp.

So how do you correct the time zone information in Aperture? Aperture has a batch change option under the meta data menu. Here is the important part. Since it recorded the correct date and time for the photo, (there is an exception to this, see below) you do not want to change the date and time, just the time zone.  You only want to change the time zone to the correct time zone.  In the batch change options, select Adjust Time Zone and then choose the intended time zone for both the Camera’s time zone and the Actual time zone. This will set the time zone to the intended time zone without adjusting the date and time. So in my example, if the time is 2014:06:20 13:58:35 EDT and the correct time zone should be PDT, I would select PDT for the Camera’s time zone and the Actual time zone to give the corrected entry at 2014:06:20 13:58:35 PDT

The exception to the rule is when your camera has airplane mode turned while taking a picture. Since this disables several functions including cellular connections where your phone would have learned its new time zone, you phone keeps the date, time, and time zone it had when you enabled airplane mode .  This occurred to me when I had imported a few photos where I took a few obligatory selfies on the airplane,  a few shots out of the plane’s window, and 2 pictures I took after I landed before I turned off the airplane mode.

In my case I was going from San Francisco (time zone PDT) to New Zealand (GMT+12) and crossing the International Date line. Upon arriving in New Zealand I took a few pictures of the inside of the airport before I remembered to turn off airplane mode. The date and time showed up as 2014:05:12 10:11:38 and when I imported into Aperture it added the time zone of EDT.

In this instance I had to correct with the Batch Change and actually change the time zone from Camera’s time Zone of PDT to Actual Time Zone of GMT+12. I knew I had to choose PDT as that is the time zone of San Francisco, where I had just come from and I knew based upon the date and time that was still using PDT for the time zone. Especially since it said 5/12 as I knew I would lose that day while crossing the International Date line as I arrived in New Zealand on the 13th.

So to summarize.

  • The iPhone does NOT include the time zone in the date and time stamp of any photo taken with your iPhone, but does use the local data and time (unless your phone is in Airplane mode)
  • When importing your photos, Aperture adds your current computer’s time zone to the picture’s date and time stamp
  • Except for pictures taken with Airplane mode on, you would use Batch Change and change the time zone by selecting the time zone for where you took the picture for both the Camera and Actual time zone’s

Plans were a bust

Well I had all the intentions in the world of making at least one post a day to this blog while on was on my trip in New Zealand. Well that turned out to be a total bust. Didn’t even get to one post let alone one a day.

The plans fell apart almost immediately after arriving in New Zealand.  I ended up spending the first 2 days spending time with relatives and figured time spent with them was much more important that writing a post here, especially since I have not seen some of them in, ahem, 20+ years.

During the rest of my trip I just didn’t seem to have the time, between driving from place to place, visiting the sights at each place, needing time to sleep, and sometimes, no internet or at least very slow internet.

The other part of my big plan was to have a picture a day posted along with a description of the area I was in or the activities and sites I had seen that day.  This became a bust as well as I was not always able to upload my photos from my memory card to computer everyday and when I did I had the brilliant idea of correcting the timestamps as I imported. This turned out to be a very bad idea. I plan on making another post related to this on what my problem was, how I fixed it after a few weeks, and what I would recommend on how to avoid the whole timestamp mix up in the first place. So keep an eye out for that.

So now that I’m back in home and have fixed my photo timestamp issues to the best of my ability, I plan on creating some of those posts that I had planned to.  Not sure if I’m going to back date them or not just yet.  My thoughts at the moment are that I will as I would like them to fall into the correct timeline for when the post should have been posted, but then again, is it better to just post on the day I actually create the post and mention the date the photo or content refers to?  Have some time to think about that until I actually create the posts, but if anyone out there has some thoughts, feel free to post a comment as I’m interested in knowing your thoughts. So let me know, Backdate or Not.


Looking for an App to help you pack, then I’ve got just what you need

Until this upcoming trip, I have only been traveling fairly close to home so I didn’t sweat it too much on what I packed. If I missed something, I always knew I could find it at a local Walmart.

This time I’m traveling internationally, so I started hunting for apps that could help with my trip.

I was looking for an app that could keep track of the items I had in each bag just so I didn’t forget anything when repacking them, how much each item weighed so I had a sense of how much my bags weighed since Airlines charge overage fees, and could create lists not only for me, but for my fellow travelers.

After looking around the App Store at free and paid packing list applications I finally decided on a paid application.

I ended up with Packing Pro by quinnscape.com

Packing LIst Pro
Buy in the App Store


This app meets my need and more.

I’m still exploring all the features, but so far one of its features I think has saved me.  It has an Expert Assistance feature that asked a few questions and helped generate a list of possible items for me to take from its Master Catalog list of packing items.  I used this to generate not only my list, but my daughters, who will be joining me on this trip.  Not being female, I do not think of all the possible things that they may need to take with them, this program helped me give them a starting list of things to consider packing, of which many I would never have thought of.

It even gives lists of things that you may need to do before you even start packing.

This is just one of its many features, I would recommend it to anyone. Before you buy this modestly priced app, visit their website as they have a much more detail description.

As of this writing, this is an IOS only App and is $2.99 as of this posting for the pro version, which I think is a steal for this app.

My first tutorial -How to clean your camera’s sensor

I’ve finally completed my first tutorial and it is a video. So please enjoy.

I walk you through how to  clean the sensor on your DSLR as I clean my Nikon d80’s sensor.

I will say, since this is my first tutorial video, it does have a few minor video issues. Such as when I was more concerned about cleaning my sensor than noticing that the lamp was in the way of what I wanted recorded.  Luckily, I did move enough so you can see what it was I was doing in the end. If I ever need to clean my sensor again I’ll think about re doing the video then.

I’ll just blame it on the Google Glass for now as that is what I was using to record the video. I was lucky enough to know someone who lent me theirs to test some of the Google Glass features and I decided to use it for creating this video.

I obviously forgot that the video camera is a little above your eyesight level so you have to remember to look down a bit to get the same angle in the Google Glass recording. Hence the lamp in the way for a short time as it was just above what I was working on.

I hope to have more video and tutorial posts to come so keep an eye out for them.

The calm after the storm

Well looks like most of the forecasts were a little off on the snow totals, which is fine by me. The lower snow amount meant less time spent cleaning up.

Not looking forward to the cold temps that are coming tonight though. Spring begins this month, but from the weather we have had lately I think it is going to be a bit late.

We did get a nice sunset over the fresh snow cover we got today.

Here is a shot from my cell phone.

The calm after the storm

Winter just won’t quit here in Maryland

We are preparing for another round of winter weather here in the Mid-Atlantic area.

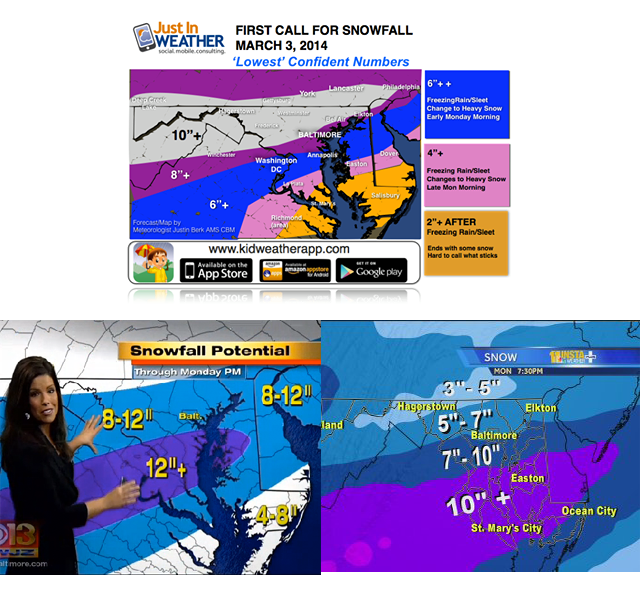
But it seems that no one can agree on how much we are going to get.  Below is snow predictions from 3 sources, Justin Berk, who does his own weather forecasting for Just in Weather #faithintheflakes  and the other 2 are local tv stations in Baltimore.

Will be interesting to see who was right. My point in all this is Mother Nature is Mother Nature, no matter how much we think we can predict her, until she does her damage, we just don’t know.

These predictions are from the 11pm news on 3/2, about 24 hours before the storm.

March 3rd Snow Preditions

One of our Corgi’s enjoying the snow

After a 1, 2 punch of snow storms, I’m wiped from clearing all the snow away.

I’m all for snow, but 2 feet in a 24 hours and cleaning things twice is a bit much. Would have just done it once, but after the big storm that left us with about 16-17 inches we were only supposed to get another inch of snow with the second storm. So I cleared everything after the first storm thinking 1 inch of snow is no big deal. Well that one inch turned into 7-8, so had to go out and clean everything I had just cleared again. 🙁

At least someone can enjoy the snow. This is one of our Corgi’s who is laying down in one of the trenches I dug in the yard so they had somewhere to run.  Seems thought that she is more content in just laying down versus running around.


Back online, Yeah….

After being down for a few days, I’m back online, yeah!

At first, I was down due to lack of power as I was a self hosted site.

After getting power back, I decided it was time to put my site on a more professional hosting service. So markdoddphotography.com is now proudly hosted on bluehost. It was highly recommended to me and so far has been very easy to set up and use.

If you would like to find out more about bluehost and their services click the icon below

[bha size=’100×100′ variation=’01’ align=’aligncenter’]

Back Online :)

I’m finally back online after being down due to lack of power

With scenes like this I consider myself lucky we weren’t down longer

20140209-134449.jpg

Recent Sale – US Naval Academy Insignia, again :)

US Naval Academy Insiginia

Been lucky again to have a sale. I do appreciate any purchase that has been made.

This is a picture of the US Naval Academy Insignia/Coat of Arms that is on the wall of the visitors center at the US Naval Academy in Annapolis Md.

I have it labeled as the insignia as not being in the military or associated with the Naval Academy, I had to look it up on the visitors website to see what it was called. I have since been told that it is actually the coat of arms.

My apologies to any Naval Academy personal or graduate if I offended by calling it the wrong thing.

I wish to thank the local buyer from Leroy, NY for purchasing one of my photos.

I’m sure it will look nice on your wall