Disclaimer: I may affiliate with a product mentioned on this page. As a result, I may receive some compensation from the vendor. This affiliation does not influence any of my commentary on any product that I may write about, nor does clicking on the affiliate links cost you anything, in fact, you may save some money.
Not only are they releasing the next update, but they are running one of their best sales ever this summer.
Here is the summer special offer pricing and the special gift you will get along with your purchase.
Luminar Neo Explore year subscription for $59 + Creative Travel Pack as a gift
Luminar Neo Pro year subscription for $79 + Creative Travel Pack as a gift
Luminar Neo Lifetime for $99 + Creative Travel Pack as a gift
Extension pack for $149
Affiliates like me have been given a special 10% off coupon code for this summer special so be sure to use the Luminar Neo discount code
AFS-5k66bP
at check out to get your extra 10% off.
Now what’s in the 1.10 update
Improvements in Extensions
They have made major changes to the Upscale AI extension to improve its performance. I’ve seen a few samples and can’t wait to try it out.
The extensions can now collapse individual Extensions panels in the Catalog view so you just see the list of titles for each so the view is not so cluttered. You expand just the extension you want to view its options
Interface changes for Noiseless AI, Supersharp AI, and Magic Light AI
Added support for additional cameras
You can now learn more about each tool by clicking its “i button”
You are now able to purchase Luminar Marketplace items directly from within Luminar. No more going from Luminar Neo to the website, and back
Many speed improvements in the various tool and Luminar Neo overall.
And of course many bug fixes for both the Mac and Windows Versions.
I’ll be downloading the update as soon as it is released on June 1st at 11 am EDT.
Disclaimer: I may affiliate with a product mentioned on this page. As a result, I may receive some compensation from the vendor. This affiliation does not influence any of my commentary on any product that I may write about, nor does clicking on the affiliate links cost you anything, in fact, you may save some money.
Since Luminar Neo has been officially released I thought I would show you an interface comparison between the now depreciated Luminar 4 (if you own Luminar 4 you can still use it, it is just not sold anymore), Luminar AI, and the new Luminar Neo
The Interface
Changes to the menu at the top of the screen.
Luminar 4
Luminar 4 has the most comprehensive menu of the three
Other than items no longer being in the top screen menu, other differences are.
Library menu item has been renamed to Catalog for both Luminar AI and Luminar Neo
The pre-created settings has been changed from “Looks” in Luminar 4, to “Templates” in Luminar AI, and now changed to “Presets” in Luminar Neo, but for Luminar Neo, the presets menu only shows in the edit module
The Export menu item has changed from the box with an up arrow in Luminar 4 and being placed in the middle of the menu, to the word Export in Luminar AI, and back to the box with an up arrow in Luminar Neo, but moved to the far right.
Export icon
Changes to the Apps Menu (What is shown is the Mac OS version, Windows menus may look different)
Luminar 4
Luminar AI
Luminar Neo
Luminar AI and Neo have similar menus. Luminar 4 has the additional Library Menu.
Full Menus from each program
Luminar 4 menus
Luminar AI Menus
Luminar Neo’s Menus
So what’s different in each.
The file menu is mostly the same with note of the different names for Presets. What is missing for Luminar AI and Luminar Neo from what is in Luminar 4’s file menu is Batch Processing.
The Edit menu is mostly the same. What is missing for Luminar AI and Luminar Neo from what is in Luminar 4’s file menu is the canvas menu. The options that are there in this canvas menu for Luminar AI and Neo are part of the tools in the Edit module if they exist at all.
There is no Library menu in Lumianar AI and Neo. That is the Catalog module in both applications.
The image menu is roughly the same in Luminar 4 and Luminar AI, but for Luminar Neo it does not have the rotate and flip options, set flag options and the only Adjustment option is to revert to the original.
The remaining windows (Account, Window, and Help) are the same across all versions of Luminar
Other inferace notes:
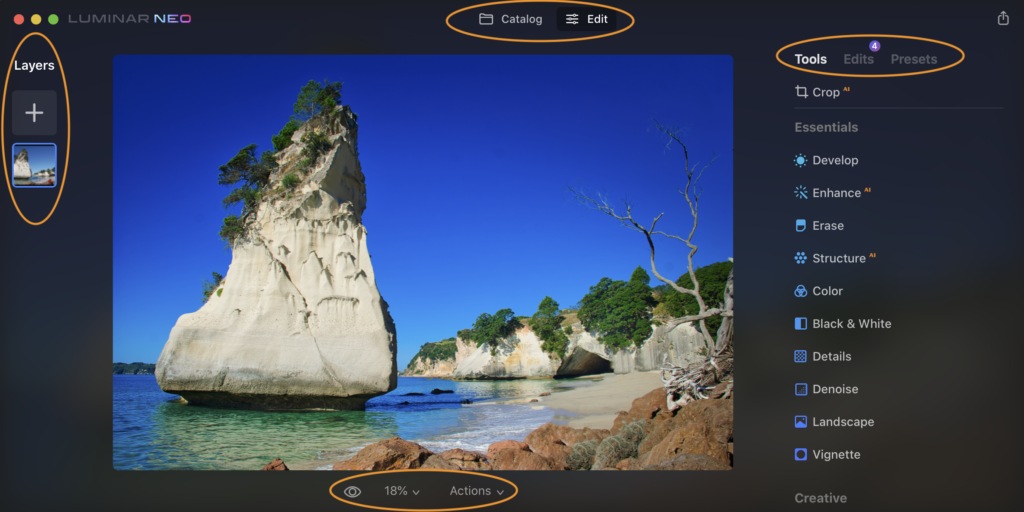
Luminar Neo did bring back layers, but this time they put the layer option by itself on the left side of the interface when in Edit mode. Not sure I like it there yet or not.
When in the Edit mode of Luminar Neo, the interface is simplified again. Just Tools, Edit, Presets main headings on the right. the See as before, zooming, and other actions menu has been moved to the bottom of the screen. See the screenshot below.
Summary
While I’m still learning about the program, just based upon what I’ve shown here and my experience so far. They are trying to simplify the interface a lot. Make it less cluttered. I’m not sure I’m a fan yet as I have been using their programs and others in the past that just got used to where things were. Now they have been moved around a lot. For example, I’m not sure why they put the Layers option on the left when they had it on the right before. To me, the order of Tools, edits, presets seems a bit out of order. I would have put the Presets first especially since if a preset is chosen, it wipes out any previous edits.
There is plenty planned for Luminar Neo in the near future (see below), but the present version is not yet a replacement for Luminar 4 in my option. Time will tell, but given you cannot purchase Luminar 4, this would be your best option for now.
Upcoming enhancements and features coming to Luminar Neo
Mask AI — Smart AI-based masking that detects specific elements in an image
Portrait Background Removal AI — Smart AI-based removal of the background behind a portrait without manual masking
Histogram
Clone & Stamp
Dodge & Burn
Undo and Redo
More Hotkeys
Copy and Paste functionality for Adjustments
More functionality when using Masking (Copy/Paste, Pen Pressure for Radius/Opacity, and Linear/Radial gradient)
There are also a few known issues that will be resolved shortly. They include:
LUTs are not applied on hover in the Mood tool
Erase steps in History may show wrong states
On macOS, the context menu is currently absent in Single Image
View for both the Catalog and Edit tabs
In the next updates, Luminar Neo will support Catalog migration. You will be able to smoothly migrate your Catalogs from Luminar 4 and Luminar AI into Luminar Neo.
All the Presets users have bought to use in Luminar Neo will be available in Skylum Account soon. To ensure the highest quality of Presets and their smooth performance in the app, some Presets are in the final testing stage and need a bit more time to be ready.
In March, Skylum will provide users with a special utility to convert custom Templates into a Luminar Neo-compatible format.
Disclaimer: I may affiliate with a product mentioned on this page. As a result, I may receive some compensation from the vendor. This affiliation does not influence any of my commentary on any product that I may write about, nor does clicking on the affiliate links cost you anything, in fact, you may save some money.
Skylum’s Luminar Neo has been released as of 2/17/2022
Release pricing and options.
You have the option to choose between a 1-year subscription or a lifetime license of Luminar Neo. Details on pricing and what is offered are.
Subscription includes ⚬ All future updates ⚬ All new feature add-ons ⚬ Workflow designed for creative photo editing ⚬ Unique AI tools to simplify repetitive tasks ⚬ Built-in library of Textures & Overlays ⚬ 30-day money-back guarantee ⚬ 24/7 technical support
Lifetime license
Luminar Neo 1 seat for $79
Luminar Neo 2 seats for $99
Lifetime license includes ⚬ Update with AI Masking and Portrait Background Removal ⚬ Performance and stability updates ⚬ Workflow designed for creative photo editing ⚬ Built-in library of Textures & Overlays ⚬ Unique AI tools to simplify repetitive tasks ⚬ Lifetime license ⚬ 30-day money-back guarantee ⚬ 24/7 technical support
Lifetime license offer for users who own Luminar or Aurora pricing is
More to come on Luminar Neo at a later date once I’ve had some more time to test things out. There has already been a dot release for Luminar Neo, so if you have already purchased, make sure to check for updates in the app.
Skylum has created a Holiday offer on their current software and the upcoming Luminar Neo. Depending upon which option you go with you could save up to 60% off their software. Details below.
You can also try my Coupon code of MARKDODD as they may get you an additional discount.
Disclaimer: I may affiliate with a product mentioned on this page. As a result, I may receive some compensation from the vendor. This affiliation does not influence any of my commentary on any product that I may write about, nor does clicking on the affiliate links cost you anything, in fact, you may save some money.
Even though it is still a few weeks away, vendors have started posting their Black Friday and Cyber Monday offers now. So as always, when I see a great deal I’ll post it here.
Skylum
The Skylum Black Friday Offer details
1 Seat:
Luminar AI + Morning Till Night* for $47 a 52% Discount
Luminar Neo + Aurora HDR for $69 a 61% Discount if purchased separately.
Luminar AI + Luminar Neo + Aurora HDR for $98 a 62% Discount if purchased separately.
2 Seats:
Luminar AI + Morning Till Night* for $59 a 50% Discount
Luminar Neo + Aurora HDR for $89 a 55% Discount if purchased separately.
Luminar AI + Luminar Neo + Aurora HDR $118 a 60% Discount if purchased separately.
Skylum Discount Code
Sometimes on these special sales, they disable discount codes, but at the time of this writing, they have not said it was disabled. So please try my Skylum Discount code of MARKDODD to save more. $ vary by product but usually $10.
EXTRA BONUS (for owners of Luminar or Aurora) get an extra $5 discount by using a Coupon code of
neo5off
This extra bonus expires November 21st at 11PM
On1
ON1 Photo RAW 2022 is available to order today for $99.99 USD for a perpetual license. Owners of any previous version of any ON1 products can order version 2022 for the upgrade price of $79.99 USD. A free 14-day trial is also available to download today.
Use On1 Coupon code of MDODD20 to get a 20% discount
Sale is on a majority if not all of their product line.
Exposure Sofware
Products such as Exposure X7, Eye Candy, and more
Disclaimer: I may affiliate with a product mentioned on this page. As a result, I may receive some compensation from the vendor. This affiliation does not influence any of my commentary on any product that I may write about, nor does clicking on the affiliate links cost you anything, in fact, you may save some money.
Disclaimer: I may affiliate with a product mentioned on this page. As a result, I may receive some compensation from the vendor. This affiliation does not influence any of my commentary on any product that I may write about, nor does clicking on the affiliate links cost you anything, in fact, you may save some money.
Skylum is showing the love for their new app by offering some great incentives to either purchase for the first time or upgrade from a previous version of Luminar to their latest product offering, LuminarAI.
For new LuminarAI customers:
LuminarAI (2 seats) for $89 ($10 off)
LuminarAI + Love Celebration Templates Collection for $98 ($20 off)
LuminarAI + Luminar X Membership + Love Celebration Templates Collection for $157 ($60 off)
For Luminar 3, Luminar 4 or Aurora HDR owners:
LuminarAI (2 seats) for $74 ($25 off)
LuminarAI (1 seat) for $64 ($15 off)
For Luminar 3, Luminar 4, Aurora HDR, or LuminarAI owners:
Add-ons up to 25% off
Adventure & Travel – $11 instead of $15
Love Celebration Templates Collection – $14 instead of $19
Tranquil Dawn Skies – $29 instead of $39
Red Skies Delight – $18 instead of $29
Colorful Coastal Palletes – $14 instead of $19
Luminar X Membership – $59/year instead of $99/year
OK, now that you have your images in LuminarAI via the Catalog, on to the next section.
Templates
Templates in LuminarAI are what use to be called Looks in Luminar. In other programs they may be referred to as presets. But basically they all do the same thing. They are a pre-set set of settings that you can apply to your image to give it a certain look.
Getting started with Templates. Select the image you wish to work in in the Catalog, then click the Templates menu at the top of the window will bring you to the Templates view
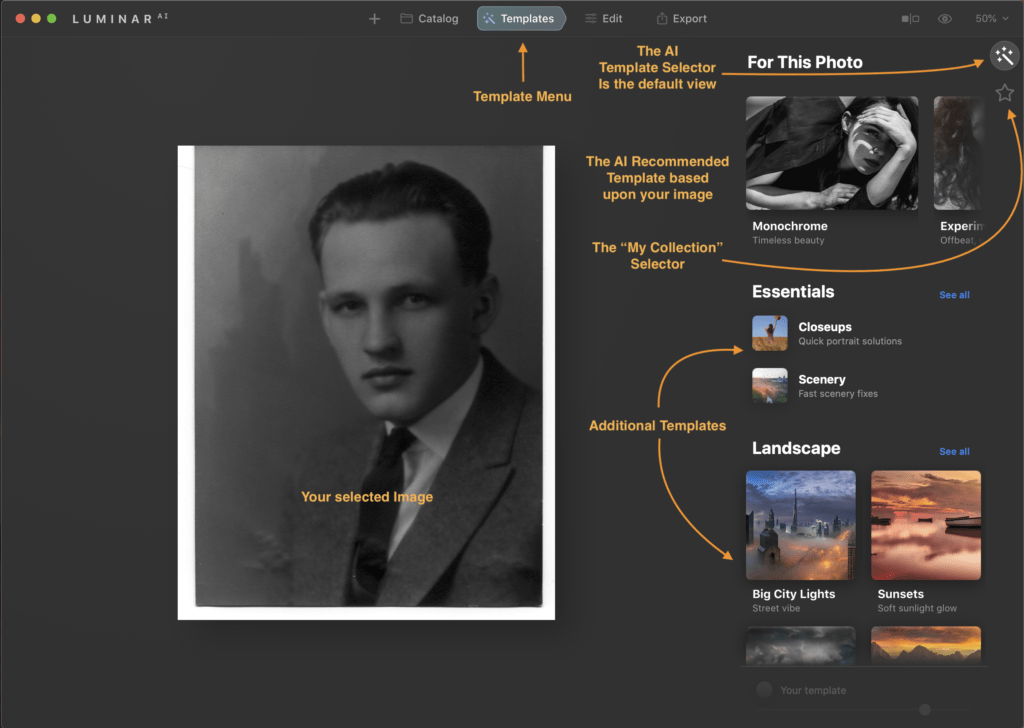
The Templates Section Layout
As you can see from the above, this layout has several sections, but the default view you are brought to is the Templates with the recommended AI template collections shown at the top of the Templates menu. Below the AI Template section are other categories of Templates that you may choose to use and those include.
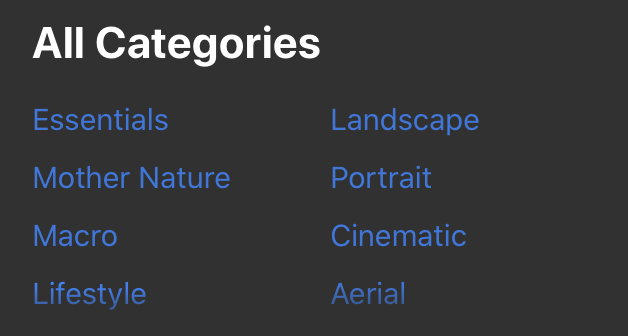
The Template Categories of Templates that come with Luminar AI
The top right of the window contains the Template Collection that Luminar AI has recommended based upon the photo that you had selected. In my example you will note that it recommended the “Monochrome” Template Collection as one it things I should like to try with this image. I suspect it choose this collection first since this is a Black and White image. There are additional recommended template collections to the right of the Monochrome Collection and to view those, you swipe to see the additional recommended Template collections.
My Collection
The Star below the “Magic Wand“ as I’m calling it is the “My Collection” menu selector. In this section,you will see any templates that you have marked as your favorites, any that you have purchased via Luminar Marketplace, User Templates (Those that you have created yourself, Yes you can do that), and lastly, Legacy Templates. The Legacy templates are where you will find any templates you have from the previous version of Luminar that are compatible with Luminar AI. Most seem to transfer in my case, but any that use depreciated tools that are no longer in LuminarAI will not transfer and would not be shown.
My Collections Menu
I’m still deciding on my new favorites, I haven’t purchased any yet, and have yet to create any myself, but you can see I have several Legacy Templates to go through in my “My Collections” menu. I’m not sure yet if LuminarAI will use any of these in the recommended Templates yet, but I suspect not. My thinking there is the newer template collections probably have additional information as part of the collection that is used the AI when determining if it is a good fit. That and I have several templates that are shown in my Legacy Templates section that are good for Black and White images and they were not included in the recommend Template collections section. If I find out otherwise, I’ll update you here.
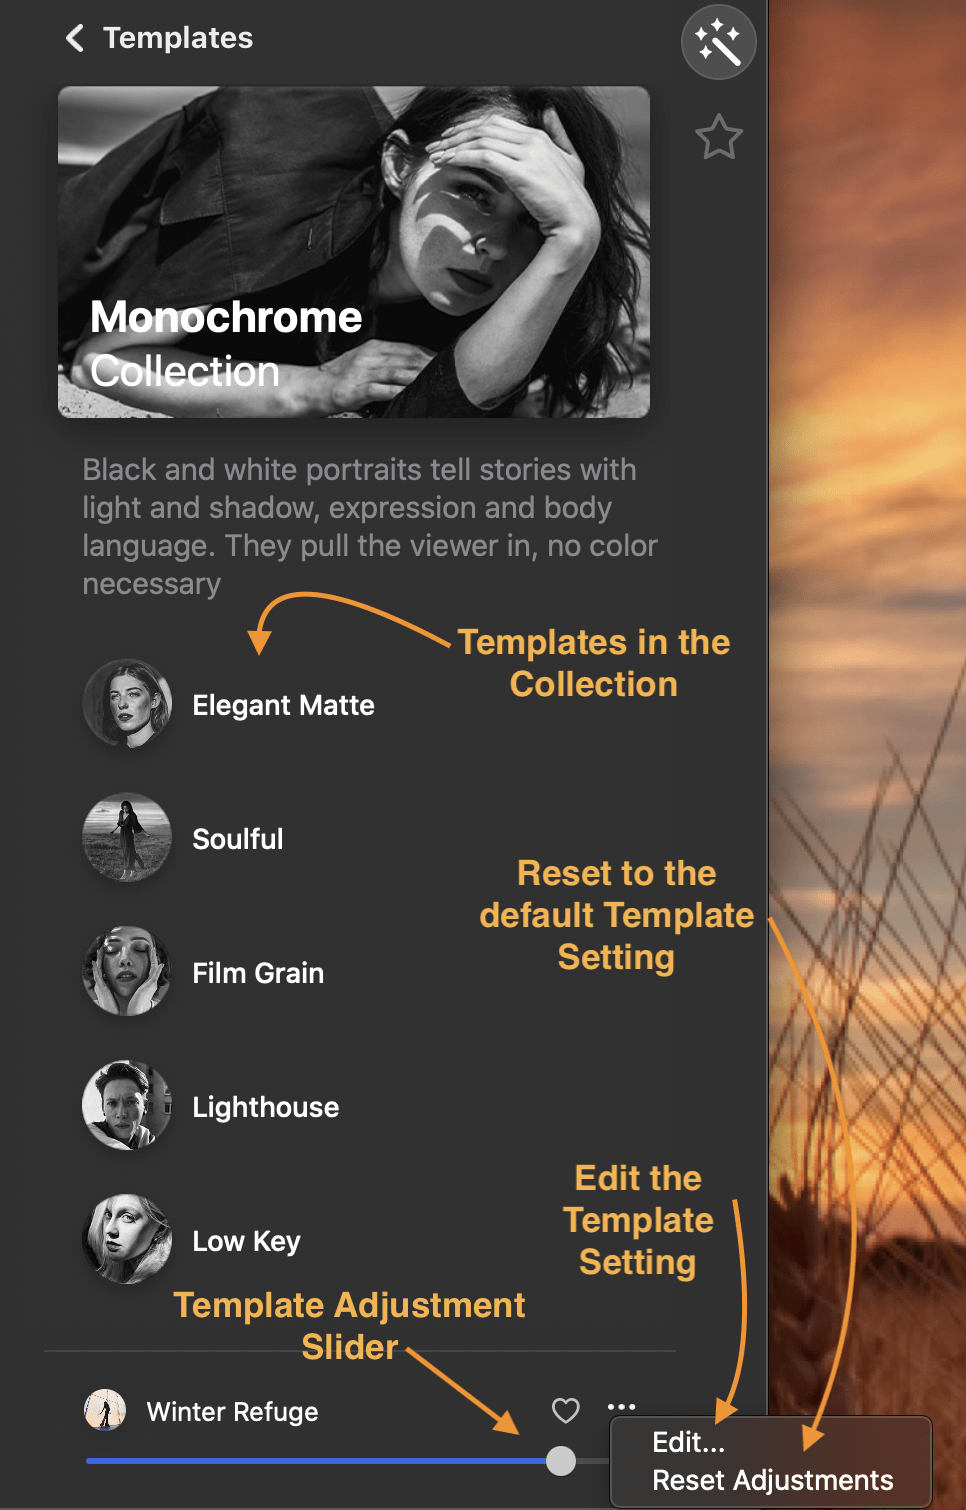
Template Collection
Once you decide on a template collection to use, you now get to choose the specific template from that collection. Each will have its own settings and a slight variation or adjustment, That’s what makes them their own template. but have the same general theme, thus the collection.
Template Collection
Above is the view of the Monochrome collection that was recommended for my image. In this collection there are 5 templates. To see your image with each template, all you need to do is click on each template and LuminarAI immediately applies the templates settings to your image.
Be sure to slide the adjustment slider to see if your image looks better with a bit less of this template applied. This is one feature of LuminarAI and for that matter, other Skylum programs that I’ve always liked. When you select a template, the effect is shown at 100%. I’ve often found templates that I like but I sometimes do not like the effect at 100% so I just slide the slider to the left to back it off a bit.
And if you don’t like the template applied, you can select another, or just choose the Reset Adjustment to go back to your image without adjustments. You know if a template has been applied as the name of the template will show at the bottom right of the window. If no template is applied, there will be no name listed, just a grayed out “Your Template”
And out goes without saying, you don’t have to just use the template collection that the AI recommends, There is many more template collections included and you can always use on of the templates included with them.
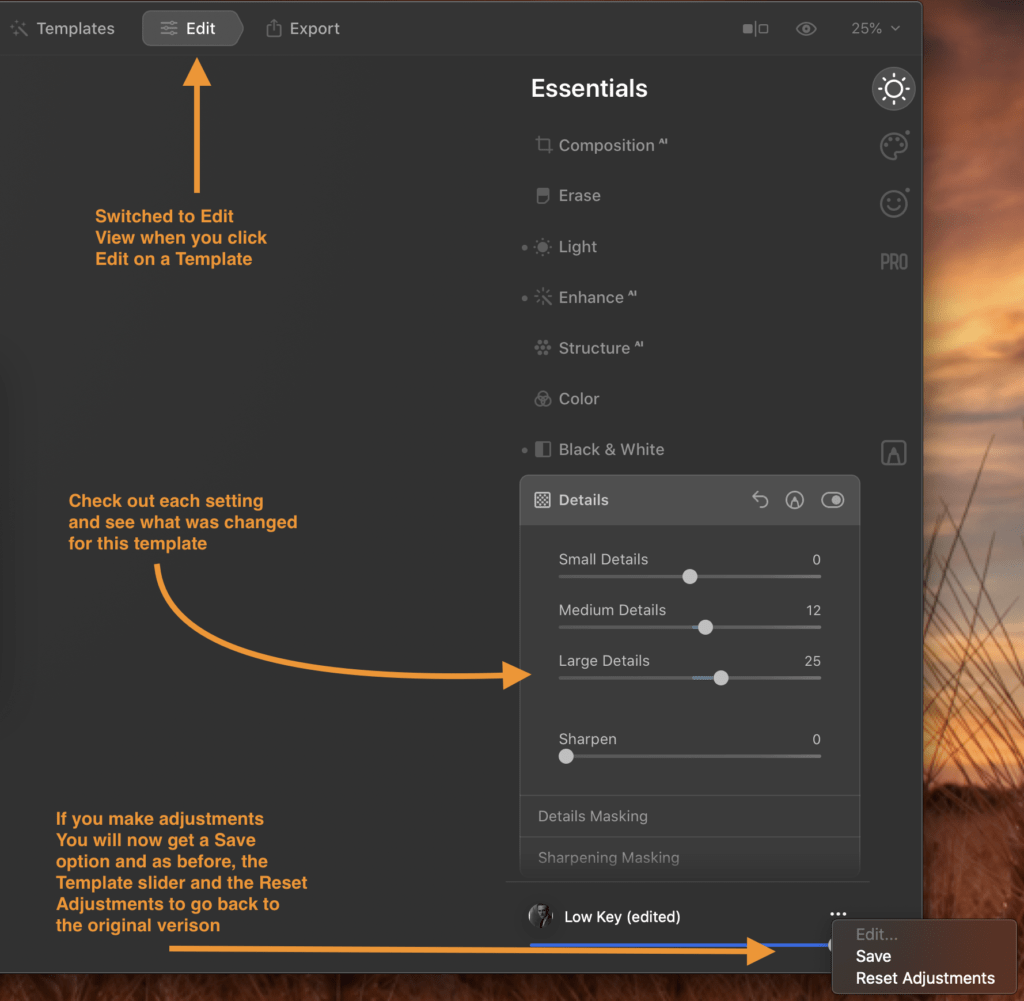
Editing a Template
Now if adjusting the slider still doesn’t get you the look you want, you can still use that template as a base. Choose Edit in the template’s menu in the bottom right to see the adjustments made in this template and to make additional changes to get the look you want.
Editing a Template’s settings
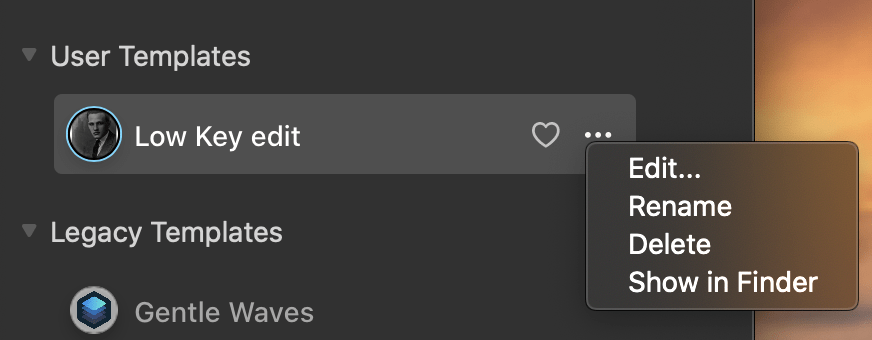
Now if you have made adjustments and really like the new look you have created and think you can use this on other images, you now have the option to save this base template with your adjustments as your own custom template. Note, the save button will only show up as being available if you have made your own adjustments. The name of the new template will be the name of the Template you used with the word Edit added. But if you go to the My Collection section and go to the User Templates section, you will now see your modified template saved in this section and you can rename it here if you want by choosing the menu on the right of the new User Template.
User Templates
We will get more into the whole editing section in Part 3 of the review.
My Thoughts on Templates
Part of the focus of LuminarAI is to make it easy to do things that use to take multiple steps or were complicated to do.
I think LuminarAI accomplishes this fairly well especially with the new AI template recommendation that is based upon it analyzing the your image and recommending which template to use. I think this recommendation is going to be very helpful to you especially if you start collecting templates. If it didn’t do this for you, you could end up going down a rabbit hole of trying to find which template may work best with your image. You could spend all your time picking a template instead of creating your work of art.. Just let LuminarAI make that selection for you and save some time.
If you are new to Photo editing, this feature will help you get the best out of your images without much work, but you don’t have to stop there. The templates are just a starting point. There is much more that this program can do for you. More on that in the Part 3 – Editing Review.
For me, I use the templates as a starting point. Either to give the overall picture a certain look before I go in and make minor adjustments, or to use as a base for creating my own custom template that I would apply to similar images.
How to update to or purchase LuminarAI
LuminarAI is offered in a couple variations as of this writing. There is a 1 Seat and a 2 Seat version.
What is meant by Seat? In short, each seat is each single installation of LuminarAI by device. So if you want to have LuminarAI on two computers you need to purchase the 2 Seat license.
LuminarAI 1 Seat – Cost is $79 before discount.
LuminarAI 2 Seats Cost is $99 before discount.
Don’t forget to use my LuminarAI Coupon Code of MARKDODD to save an additional amount when you purchase.
There is a 30 day money back guarantee from the time of shipping, which is currently set for December 15th, 2020; so if for some reason you are not happy, you can get your money back.
Please make sure your system is up to the task by checking it against the System requirements listed at the bottom of the product page. And yes, it does work with Mac OS Big Sur. But one note: LuminarAI is not yet been certified as of this writing with the new Apple M1 chip computers. I fully expect to be, but Skylum is still doing its testing on the new M1 chip hardware.
This review is based upon a beta version of LuminarAI, Skylum’s latest photo editor. As such some things may be a little different between the version reviewed and the final released version.
I have been a long-time Skylum customer, back even to the MacPhun days, and as such, I have seen their programs evolve over time. Some things I agree with, some I do not. I hope this to be an unbias review of their latest program LuminarAI.
What LuminarAI is and What it is not.
This is NOT an upgrade/update to Luminar 4. Despite having the base name, this is an entirely new program. Instead of just patching things in Luminar 4, Skylum made the decision to start from scratch with this new program. They, I believe, have taken the best of all their previous programs and some they acquired to make this new Photo editor that combines everything into one application.
This is NOT a cataloging program, aka DAM (Digital Asset Manager). Although you can view your images in what they have labeled a Catalog, in my option, this is more of a browser than a catalog. My view of what a catalog is is something that lets you tag, keyword, label, or add other metadata to your image. LuminarAI does not do this. There are many other programs that can serve this function well, those include Adobe Lightroom, On1, Capture One, ACDsee Photo for example.
Some initial comments
LuminarAI is intended to be a program for everyone. It has been designed for the beginner photographer and has options to add that level of user improve their image using AI but it also has the full set of tools a more advanced photographer would want to make more finite adjustments.
As part of this, LuminarAI is taking advantage of AI (Artificial Intelligence) that will analyze your image and make adjustments with little effort on your part. This seems to be a trend in photo editors, the AI bit, and I see this as becoming the norm for all photo editors. More to come on this in the part 3 review post when we get into editing.
In order not to have it be one very long post, I’m breaking it down into several parts. Part 1 will start out with the Catalog, Part 2 will be Templates, Part 3 will be Editing/Exporting
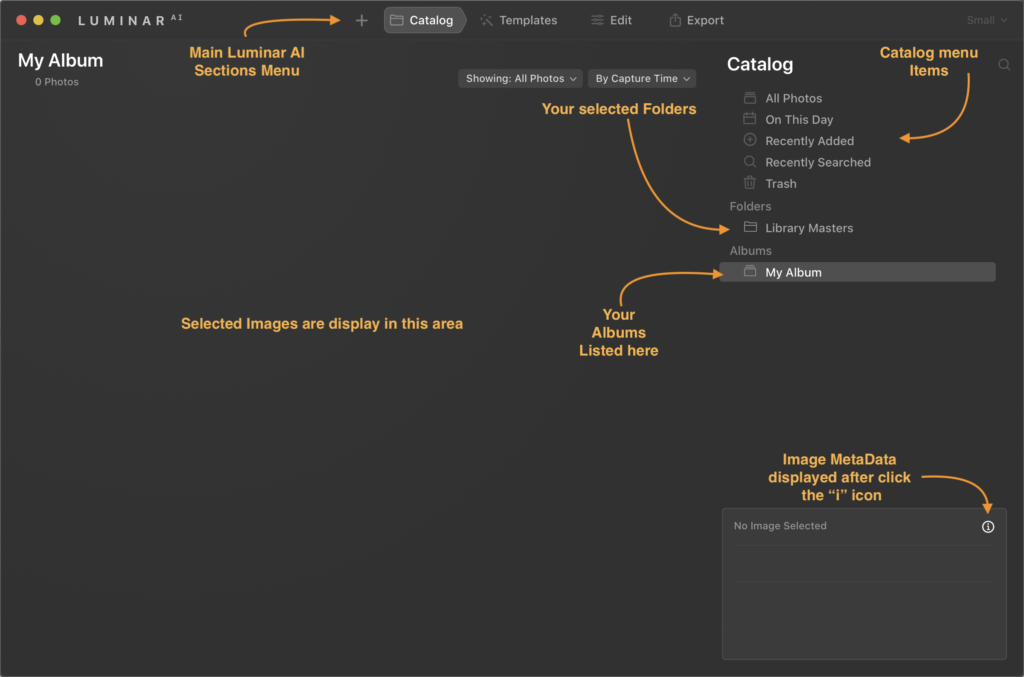
The Catalog
The Catalog in LuminarAI is quite functional for its purposes of letting you view your entire photo library. This is the view you are brought to when you open the program.
For you Luminar 4 users, important note, it does not open/convert your Luminar 4 catalog. When you open LuminarAI for the first time, it will ask you to locate your images so that it can create a fresh catalog of all your images. So, this is a bit of a repeat step but is necessary as they have written the catalog file to improve performance. At first, I thought this would be a bit deal, but after thinking about it what would I rather have done, have a new catalog that is much faster at responding and have to create my Albums from scratch, or have my albums with a slower catalog view. I’d take the faster catalog,
It has default items of All Photos, On this day, Recently added, Recently Searched (although this will only show up after your first search), and Trash (contains items you have trashed in LuminarAI, but they are not yet deleted from your physical photo library). Items are added when you select Move to Luminar Trash on any image.
There is a Folder section that shows what folders you have added to LuminarAI for it to show in your Catalog view. This folders section can contain 1 or many folders, and if you subfolders, you can expand the top-level folder to show those subfolders. The Albums section is where you can create your own Albums to help you organize your images locally or any other way you would like. It doesn’t physically move the image on your computer but lets you group images together in any way you would like.
It has a built-in search function that does let you search but image or folder name, date, or extension to help find your images wither they be in a folder, Album. Once you have found your image, you can see a bit more metadata of the image by clicking the little “i” icon on the bottom left of the Luminar window to show basic metadata information about the image, such as filename and extension, the ISO, Focal length, EV, F stop, and the shutter speed of your image; the date/time, dimensions, and file size of the image; and lastly the device it was taken on including the lens.
The interface
How to update to or purchase LuminarAI
LuminarAI is offered in a couple variations as of this writing. There is a 1 Seat and a 2 Seat version.
What is meant by Seat? In short, each seat is each single installation of LuminarAI by device. So if you want to have LuminarAI on two computers you need to purchase the 2 Seat license.
LuminarAI 1 Seat – Cost is $79 before discount.
LuminarAI 2 Seats Cost is $99 before discount.
Don’t forget to use my LuminarAI Coupon Code of MARKDODD to save an additional amount when you purchase.
There is a 30 day money back guarantee from the time of shipping, which is currently set for December 15th, 2020; so if for some reason you are not happy, you can get your money back.
Please make sure your system is up to the task by checking it against the System requirements listed at the bottom of the product page. And yes, it does work with Mac OS Big Sur. But one note: LuminarAI is not yet been certified as of this writing with the new Apple M1 chip computers. I fully expect to be, but Skylum is still doing its testing on the new M1 chip hardware.
Today Skylum is announcing LuminarAI. It is an all-new program and plugin that is part of the Skylum family of Photo Editors. This is not an upgrade to Luminar 4, but an entirely new program built from the ground up.
LuminarAI is focused on an entirely new, non-conventional approach to photo editing. Using the Power of AI, some of which have been in previous Skylum products, to focus on results, not the process. It is designed to remove the boring more complex aspects of photo editing but still give a professional quality image.
Part of the intent is to no longer make it about the complex tasks and processes of photo editing but to simplify complex tasks and processes for you and let you concentrate on your creative side. The AI does the work and your creative side is let loose.
Features
Portraits take on new life.
Use BodyAI and FaceAI to gently sculpt and refine a portrait.
Create eyes that are rich and expressive with IrisAI.
Remove blemishes and imperfections naturally with SkinAI.
Landscape photography has never looked better.
Add depth and detail to skies with AtmosphereAI and Sky Enhancer.
Transform a photo and add an all-new sky in seconds with SkyAI.
Bring warmth with Golden Hour or even enhance the sun with Sunrays.
Professional finishing with less hassle.
Looking for more detail and texture? Then StructureAI is the perfect addition.
Get the perfect crop with CompositionAI and fix crooked images.
With AccentAI, a photo has perfect exposure and color.
LuminarAI Does the work for you.
LuminarAI recognizes the contents of your photo and suggests what it thinks are the best templates based upon that content to speed up your workflow. You can then easily apply and refine your image from those template starting points, or just leave it as shown form the template. The choice is yours.
Early-bird pricing for the first 30,000 customers
You can pre-order LuminarAI now and not have to worry. Skylum is offering a 30-day money-back guarantee from the time of shipping, not the time of purchase. So you can purchase now, when the product ships if you are unsatisfied, you can get a full refund within the 30 days. But I”m sure you will be happy with your purchase.
Early bird pricing will be available for the first 30,000 artists worldwide to preorder LuminarAI. Once these copies are sold, the price will go up.
LuminarAI is just US$69 with the loyalty discount (for those who have purchased Luminar 4, Aurora HDR 2019, or Aurora HDR) and includes access to the LuminarAI Insiders community.
LuminarAI is just US$79 for new customers and includes access to the LuminarAI Insiders community.
Note: The Skylum discount code does not apply to the pre-Order special pricing of LuminarAI, but it does still apply to Lunimar 4 and Aurora HDR 2019 (That code being MARKDODD)
Comparison of Luminar 4 to LuminarAI
Luminar 4
LuminarAI
Catalog AI Sky Enhance AI Accent AI Structure AI Portrait AI Skin Enhancer AI Sky Replacement AI Augmented Sky Looks a Multitude of controls
Rebuilt from the Ground up
New Catalog (cannot import a Luminar 4 catalog) BodyAI FaceAI IrisAI SkinAI AtmosphereAI and Sky Enhancer SkyAI Sunrays StructureAI CompositionAI AccentAI Intelligent Templates (based upon your photo)
And more information to come as we get closer to the ship date. No specific ship date has been set other than during the Holiday Season this year.
Trial version will be available when the product starts shipping.
LuminarAI is not an upgrade replacement for Luminar 4 but is an entirely new program. Luminar 4 will continue to be sold during the Pre-order timeframe of LuminarAI and then Luminar 4 will get support, and updates for at least 1 more year after the shipping of LuminarAI. After that time you can still use Luminar 4, but updates will end. This is so folks who have an older system still have access to a Luminar 4 version for editing.