
OK, now that you have your images in LuminarAI via the Catalog, on to the next section.
Templates
Templates in LuminarAI are what use to be called Looks in Luminar. In other programs they may be referred to as presets. But basically they all do the same thing. They are a pre-set set of settings that you can apply to your image to give it a certain look.
Getting started with Templates. Select the image you wish to work in in the Catalog, then click the Templates menu at the top of the window will bring you to the Templates view
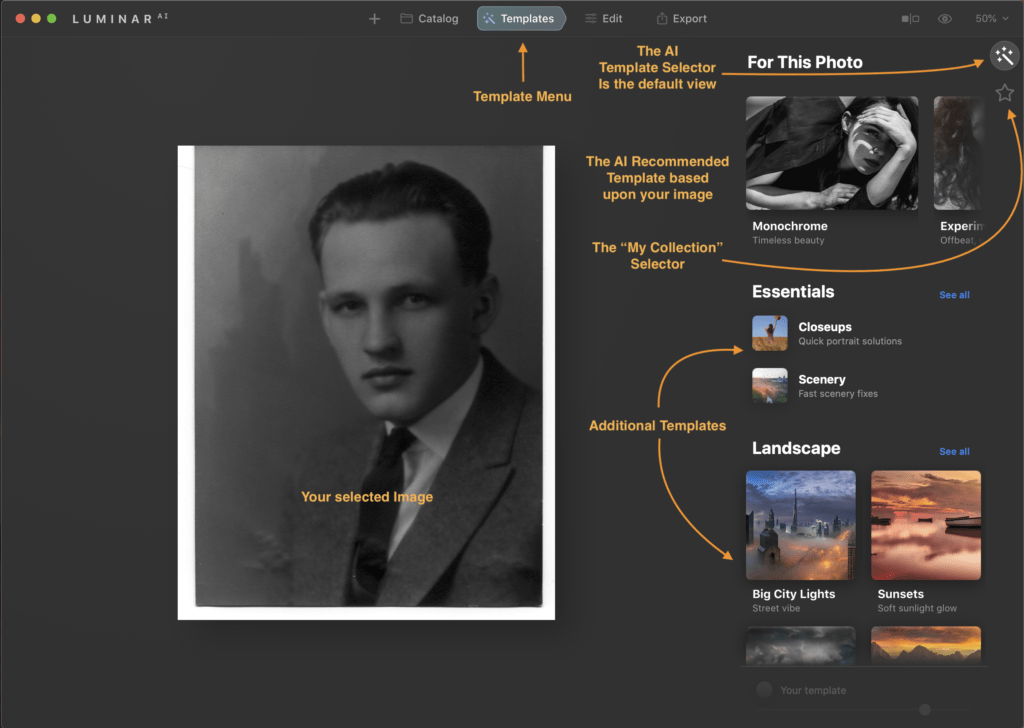
As you can see from the above, this layout has several sections, but the default view you are brought to is the Templates with the recommended AI template collections shown at the top of the Templates menu. Below the AI Template section are other categories of Templates that you may choose to use and those include.
The top right of the window contains the Template Collection that Luminar AI has recommended based upon the photo that you had selected. In my example you will note that it recommended the “Monochrome” Template Collection as one it things I should like to try with this image. I suspect it choose this collection first since this is a Black and White image. There are additional recommended template collections to the right of the Monochrome Collection and to view those, you swipe to see the additional recommended Template collections.
My Collection
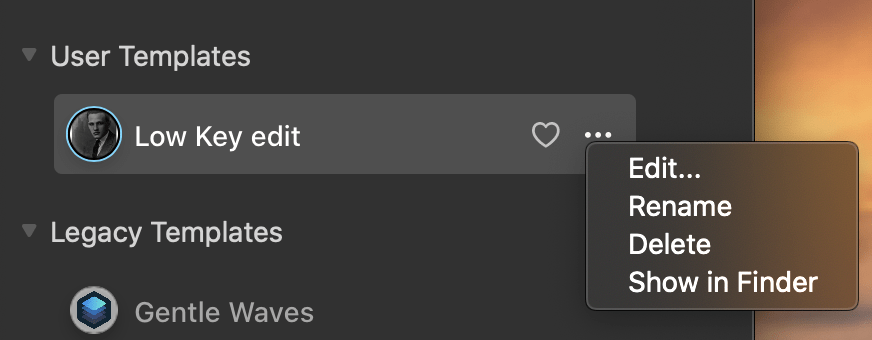
The Star below the “Magic Wand“ as I’m calling it is the “My Collection” menu selector. In this section, you will see any templates that you have marked as your favorites, any that you have purchased via Luminar Marketplace, User Templates (Those that you have created yourself, Yes you can do that), and lastly, Legacy Templates. The Legacy templates are where you will find any templates you have from the previous version of Luminar that are compatible with Luminar AI. Most seem to transfer in my case, but any that use depreciated tools that are no longer in LuminarAI will not transfer and would not be shown.

I’m still deciding on my new favorites, I haven’t purchased any yet, and have yet to create any myself, but you can see I have several Legacy Templates to go through in my “My Collections” menu. I’m not sure yet if LuminarAI will use any of these in the recommended Templates yet, but I suspect not. My thinking there is the newer template collections probably have additional information as part of the collection that is used the AI when determining if it is a good fit. That and I have several templates that are shown in my Legacy Templates section that are good for Black and White images and they were not included in the recommend Template collections section. If I find out otherwise, I’ll update you here.
Template Collection
Once you decide on a template collection to use, you now get to choose the specific template from that collection. Each will have its own settings and a slight variation or adjustment, That’s what makes them their own template. but have the same general theme, thus the collection.
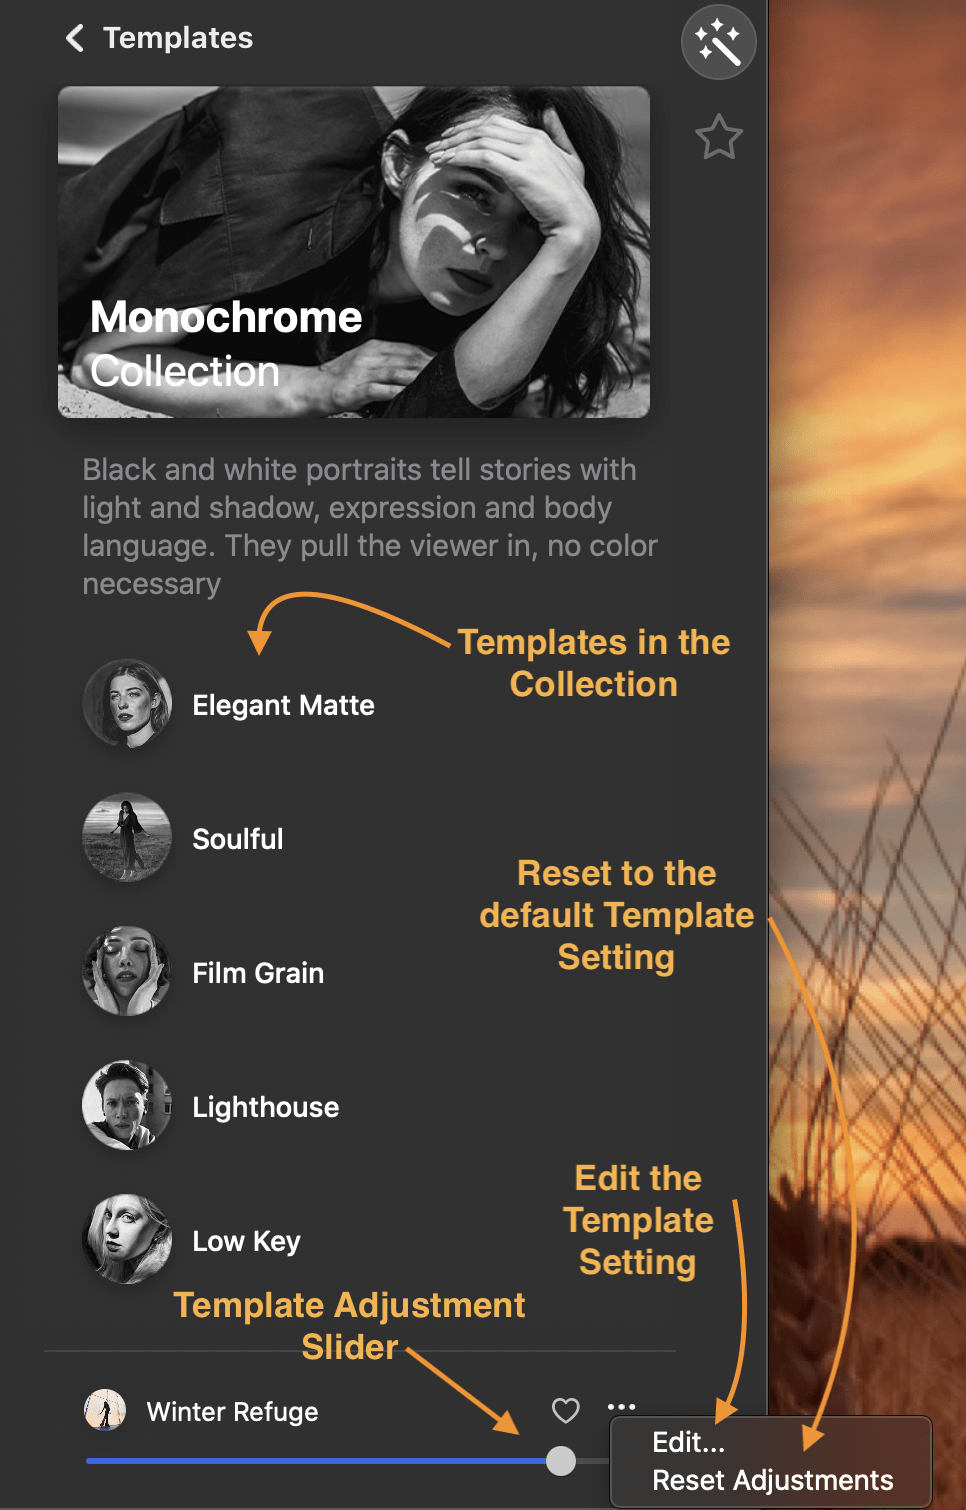
Above is the view of the Monochrome collection that was recommended for my image. In this collection there are 5 templates. To see your image with each template, all you need to do is click on each template and LuminarAI immediately applies the templates settings to your image.
Be sure to slide the adjustment slider to see if your image looks better with a bit less of this template applied. This is one feature of LuminarAI and for that matter, other Skylum programs that I’ve always liked. When you select a template, the effect is shown at 100%. I’ve often found templates that I like but I sometimes do not like the effect at 100% so I just slide the slider to the left to back it off a bit.
And if you don’t like the template applied, you can select another, or just choose the Reset Adjustment to go back to your image without adjustments. You know if a template has been applied as the name of the template will show at the bottom right of the window. If no template is applied, there will be no name listed, just a grayed out “Your Template”
And out goes without saying, you don’t have to just use the template collection that the AI recommends, There is many more template collections included and you can always use on of the templates included with them.
Editing a Template
Now if adjusting the slider still doesn’t get you the look you want, you can still use that template as a base. Choose Edit in the template’s menu in the bottom right to see the adjustments made in this template and to make additional changes to get the look you want.
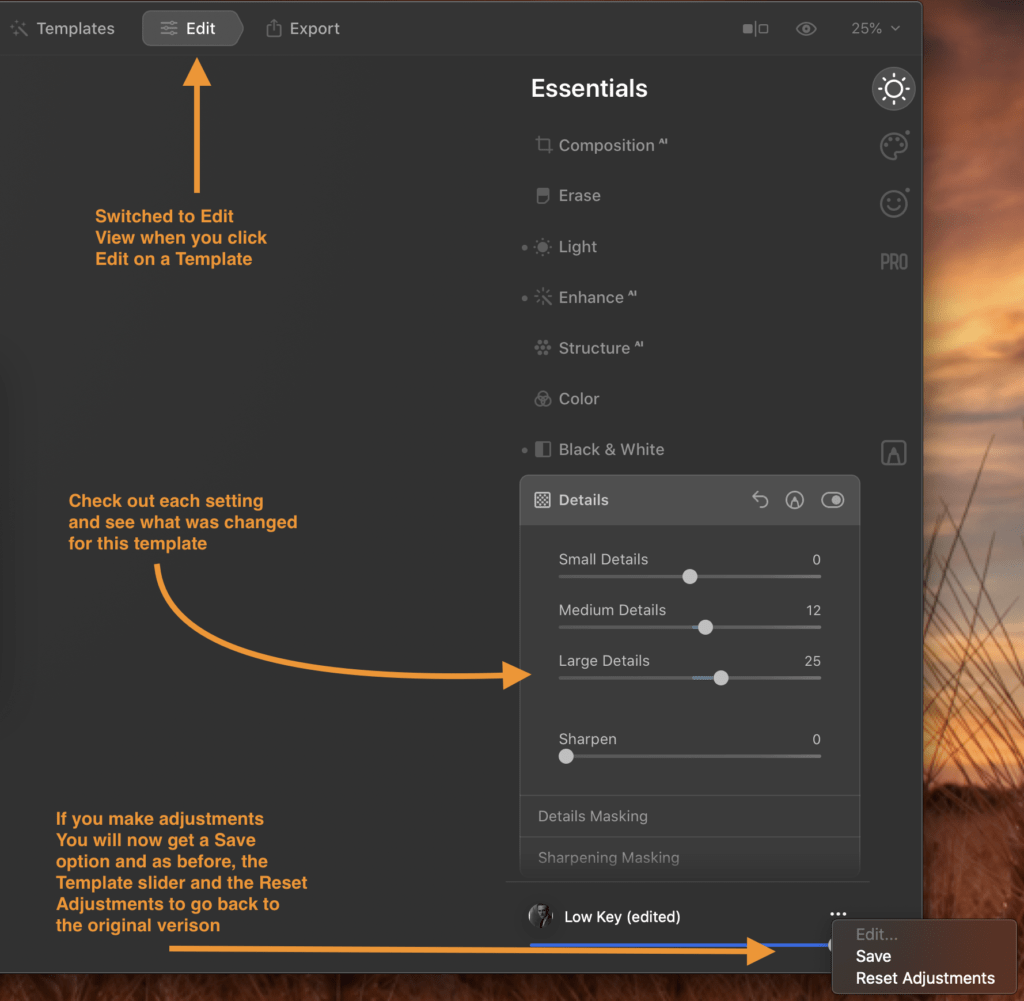
Now if you have made adjustments and really like the new look you have created and think you can use this on other images, you now have the option to save this base template with your adjustments as your own custom template. Note, the save button will only show up as being available if you have made your own adjustments. The name of the new template will be the name of the Template you used with the word Edit added. But if you go to the My Collection section and go to the User Templates section, you will now see your modified template saved in this section and you can rename it here if you want by choosing the menu on the right of the new User Template.
We will get more into the whole editing section in Part 3 of the review.
My Thoughts on Templates
Part of the focus of LuminarAI is to make it easy to do things that use to take multiple steps or were complicated to do.
I think LuminarAI accomplishes this fairly well especially with the new AI template recommendation that is based upon it analyzing the your image and recommending which template to use. I think this recommendation is going to be very helpful to you especially if you start collecting templates. If it didn’t do this for you, you could end up going down a rabbit hole of trying to find which template may work best with your image. You could spend all your time picking a template instead of creating your work of art.. Just let LuminarAI make that selection for you and save some time.
If you are new to Photo editing, this feature will help you get the best out of your images without much work, but you don’t have to stop there. The templates are just a starting point. There is much more that this program can do for you. More on that in the Part 3 – Editing Review.
For me, I use the templates as a starting point. Either to give the overall picture a certain look before I go in and make minor adjustments, or to use as a base for creating my own custom template that I would apply to similar images.
How to update to or purchase LuminarAI
LuminarAI is offered in a couple variations as of this writing. There is a 1 Seat and a 2 Seat version.
What is meant by Seat? In short, each seat is each single installation of LuminarAI by device. So if you want to have LuminarAI on two computers you need to purchase the 2 Seat license.
LuminarAI 1 Seat – Cost is $79 before discount.
LuminarAI 2 Seats Cost is $99 before discount.
Don’t forget to use my LuminarAI Coupon Code of MARKDODD to save an additional amount when you purchase.
There is a 30 day money back guarantee from the time of shipping, which is currently set for December 15th, 2020; so if for some reason you are not happy, you can get your money back.
Please make sure your system is up to the task by checking it against the System requirements listed at the bottom of the product page. And yes, it does work with Mac OS Big Sur. But one note: LuminarAI is not yet been certified as of this writing with the new Apple M1 chip computers. I fully expect to be, but Skylum is still doing its testing on the new M1 chip hardware.